电脑用久了之后,会变得很卡,各种文件乱七八糟的占满C盘,都不知道该如何清理。因此,养成良好的使用习惯,定期重装系统,是提升工作效率和乐趣的重要一环。但是电脑上个人文件和微信 QQ 传送的文件经年累月的累积下来,不好整理也无法丢弃。各种软件破解,开发相关的环境配置,都让你害怕而一再向卡慢的电脑妥协。
本指南意在探索 Win 10 /11 最舒适的重装工作流和配置习惯。
工作向文件通过坚果云同步,office 文档通过 WPS 云同步自动上传
微信 QQ 聊天记录周期性备份到电脑端,然后再同步到云盘
C盘空间给大,有注册表写入的,重装系统会重装的软件,直接放C盘
绿色软件、个人文档、游戏资料库(如 steam 库,战网游戏)放其他盘,重装系统不受影响
很容易忘记备份而在重装系统之后丢失的文件
- 桌面文件
- xshell 配置文件
- QQ 微信桌面版聊天文件
- 工作IM聊天文件
- 保存在用户目录下的一些配置文件
- IDE 创建的工程项目
轻松传 非常方便的本地快传网页工具
准备U盘,用 WePE 格盘
系统镜像站推荐
推荐安装 Windows 11系统
12代及以上 Intel 处理器,强烈建议安装 win11,因为 win10 及以下的系统不支持大小核处理器的优化。
win10系统推荐Windows 10 Enterprise LTSC 2021 (x64),没有微软商店,仅预装新版edge浏览器。==但该版本仅支持有线网络连接,没有无线网卡驱动,请提前准备==
建议先让 windows 自己更新的同时安装驱动,然后再去官网选择需要的驱动
火绒 —— 根据需要添加弹窗拦截、垃圾清理、启动项管理、右键管理、流量浮窗
win 11 系统建议直接使用微软自带输入法
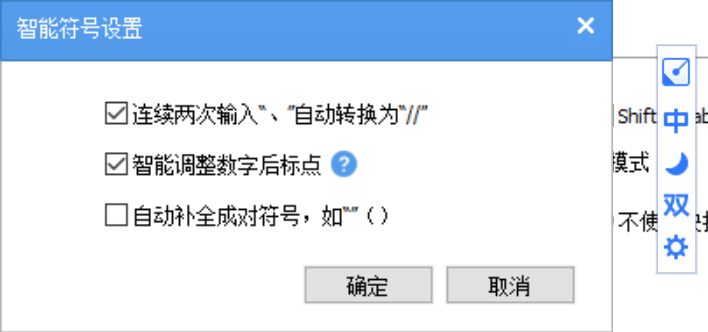
推荐轻量化的手心输入法,最喜欢的两个功能点:中文模式下连续两次输入、自动转换为//,状态栏自定义,可竖排,可一键在全拼双拼切换
微软自带输入法加载小鹤双拼
Windows Registry Editor Version 5.00

[HKEY_CURRENT_USER\SOFTWARE\Microsoft\InputMethod\Settings\CHS]
"EnableExtraDomainType"=dword:00000001
"Enable Double Pinyin"=dword:00000001
"DoublePinyinScheme"=dword:0000000a
"UserDefinedDoublePinyinScheme0"="小鹤双拼*2*^*iuvdjhcwfg^xmlnpbksqszxkrltvyovt"桌面图标按修改日期排序,最新的文件会排在最后,方便找到
绿色版 Clash 装在非C盘,重装系统后可以继续用,但是要重新导入配置文件,记住一定要从界面导入,而不是直接把文件复制到 config 文件夹
Chrome 首次进入时需要通过命令行启用 proxy
从桌面图标进入安装目录,在地址栏输入 cmd 启动命令行,然后用下方指令启动程序
chrome --proxy-server="socks5://127.0.0.1:7890"
然后登录账号,自动同步
switchyOmega 的配置文件,需要从别处或者先前电脑备份导出
PowerShell must be enabled for your user account e.g.
Set-ExecutionPolicy -ExecutionPolicy RemoteSigned -Scope CurrentUser
PowerShell 启用代理
# If you want to use a proxy that isn't already configured in Internet Options
[net.webrequest]::defaultwebproxy = new-object net.webproxy "127.0.0.1:7890"
Run the following command from your PowerShell to install scoop to its default location (C:\Users\<user>\scoop)
Invoke-Expression (New-Object System.Net.WebClient).DownloadString('https://get.scoop.sh')

# or shorter
iwr -useb get.scoop.sh | iex
给 Scoop 配置代理
# anonymous authentication to proxy.example.org on port 8080:
scoop config proxy 127.0.0.1:7890
初次安装之后我们可以通过运行 scoop checkup 来检测当前潜在问题,然后根据提示进行修正
程序安装路径:
- 用户级别安装的程序 和 Scoop 本身默认安装于
C:\Users\<user>\scoop - 全局安装的程序(所有用户可用,使用
--global或-g选项)位于C\ProgramData\scoop路径中。
随心安装,嗨翻天!
# scoop 必备工具,7zip 全局安装是为了后面用管理员权限添加到右键菜单
scoop install sudo git aria2
sudo scoop install 7zip --global
# 命令行用的工具,可以不装
scoop install curl grep sed less touch

# 装一些不需要写注册表的软件
scoop bucket add extras
# 微软公司 Visual C++的32位运行时库,优先安装
scoop install vcredist2022
# wt若系统自带则无需安装
scoop install windows-terminal
# everything 全局安装,也可以不全局安装,在软件中选择加载到服务中
sudo scoop install everything -g
# 工具向软件,自由选择
scoop install keepassxc
scoop install typora
scoop install snipaste
scoop install SumatraPDF
# 不全局安装很多嵌入式网页无法加载
sudo scoop install vscode -g

# 安装字体
scoop bucket add nerd-fonts
scoop install Source-Han-Sans-SC # 思源黑
scoop install Source-Han-Serif-SC # 思源宋
scoop install FiraCode # wt用的字体
scoop install SarasaGothic-SC # 安装更纱黑体(简体中文)
scoop install Wenquanyi-Microhei # 安装文泉驿微米黑
scoop install Wenquanyi-Zenhei # 安装文泉驿正黑

# 安装 jdk
scoop bucket add java
scoop search jdk8
安装字体之后,给输入法替换显示字体
yoga 14s 2880x1800 200% 缩放下显示效果如下
sudo scoop install switchhosts -g
==需要给原版 hosts 文件添加写入权限才能对其进行操作==
# My hosts
# raw.githubusercontent.com
185.199.108.133 raw.githubusercontent.com user-images.githubusercontent.com avatars2.githubusercontent.com avatars1.githubusercontent.com
185.199.109.133 raw.githubusercontent.com user-images.githubusercontent.com avatars2.githubusercontent.com avatars1.githubusercontent.com
185.199.110.133 raw.githubusercontent.com user-images.githubusercontent.com avatars2.githubusercontent.com avatars1.githubusercontent.com
185.199.111.133 raw.githubusercontent.com user-images.githubusercontent.com avatars2.githubusercontent.com avatars1.githubusercontent.com

# wikipedia.org
208.80.153.224 wikipedia.org
2620:0:860:ed1a::1 wikipedia.org

# short url
127.0.0.1 l.ttsettings.json 配置供参考
{
    "$help": "https://aka.ms/terminal-documentation",
    "$schema": "https://aka.ms/terminal-profiles-schema",
    "actions":
    [
        {
            "command":
            {
                "action": "copy",
                "singleLine": false
            },
            "keys": "ctrl+c"
        },
        {
            "command": "paste",
            "keys": "ctrl+v"
        },
        {
            "command": "find",
            "keys": "ctrl+shift+f"
        },
        {
            "command":
            {
                "action": "splitPane",
                "split": "auto",
                "splitMode": "duplicate"
            },
            "keys": "alt+shift+d"
        }
    ],
    "copyFormatting": "none",
    "copyOnSelect": false,
    "defaultProfile": "{61c54bbd-c2c6-5271-96e7-009a87ff44bf}",
    "experimental.rendering.forceFullRepaint": true,
    "experimental.rendering.software": true,
    "profiles":
    {
        "defaults":
        {
            "antialiasingMode": "cleartype",
            "font":
            {
                "face": "Fira Code Retina",
                "size": 12,
                "weight": "medium"
            }
        },
        "list":
        [
            {
                "commandline": "%SystemRoot%\\System32\\WindowsPowerShell\\v1.0\\powershell.exe",
                "guid": "{61c54bbd-c2c6-5271-96e7-009a87ff44bf}",
                "hidden": false,
                "name": "Windows PowerShell"
            },
            {
                "commandline": "%SystemRoot%\\System32\\cmd.exe",
                "guid": "{0caa0dad-35be-5f56-a8ff-afceeeaa6101}",
                "hidden": false,
                "name": "\u547d\u4ee4\u63d0\u793a\u7b26"
            },
            {
                "closeOnExit": "graceful",
                "colorScheme": "GitBash",
                "commandline": "C:\\Users\\1062\\scoop\\apps\\git\\current\\bin\\bash.exe --login -i -l",
                "cursorColor": "#FFFFFF",
                "cursorShape": "bar",
                "font":
                {
                    "face": "Fira Code Retina",
                    "size": 12
                },
                "guid": "{00000000-0000-0000-0000-000000000001}",
                "historySize": 9001,
                "icon": "C:\\Users\\1062\\scoop\\apps\\git\\current\\mingw64\\share\\git\\git-for-windows.ico",
                "name": "GitBash",
                "opacity": 100,
                "padding": "0, 0, 0, 0",
                "snapOnInput": true,
                "startingDirectory": "%USERPROFILE%",
                "useAcrylic": false
            },
            {
                "guid": "{b453ae62-4e3d-5e58-b989-0a998ec441b8}",
                "hidden": false,
                "name": "Azure Cloud Shell",
                "source": "Windows.Terminal.Azure"
            }
        ]
    },
    "schemes":
    [
        {
            "background": "#0C0C0C",
            "black": "#0C0C0C",
            "blue": "#0037DA",
            "brightBlack": "#767676",
            "brightBlue": "#3B78FF",
            "brightCyan": "#61D6D6",
            "brightGreen": "#16C60C",
            "brightPurple": "#B4009E",
            "brightRed": "#E74856",
            "brightWhite": "#F2F2F2",
            "brightYellow": "#F9F1A5",
            "cursorColor": "#FFFFFF",
            "cyan": "#3A96DD",
            "foreground": "#CCCCCC",
            "green": "#13A10E",
            "name": "Campbell",
            "purple": "#881798",
            "red": "#C50F1F",
            "selectionBackground": "#FFFFFF",
            "white": "#CCCCCC",
            "yellow": "#C19C00"
        },
        {
            "background": "#012456",
            "black": "#0C0C0C",
            "blue": "#0037DA",
            "brightBlack": "#767676",
            "brightBlue": "#3B78FF",
            "brightCyan": "#61D6D6",
            "brightGreen": "#16C60C",
            "brightPurple": "#B4009E",
            "brightRed": "#E74856",
            "brightWhite": "#F2F2F2",
            "brightYellow": "#F9F1A5",
            "cursorColor": "#FFFFFF",
            "cyan": "#3A96DD",
            "foreground": "#CCCCCC",
            "green": "#13A10E",
            "name": "Campbell Powershell",
            "purple": "#881798",
            "red": "#C50F1F",
            "selectionBackground": "#FFFFFF",
            "white": "#CCCCCC",
            "yellow": "#C19C00"
        },
        {
            "background": "#000000",
            "black": "#0C0C0C",
            "blue": "#6060FF",
            "brightBlack": "#767676",
            "brightBlue": "#3B78FF",
            "brightCyan": "#61D6D6",
            "brightGreen": "#16C60C",
            "brightPurple": "#B4009E",
            "brightRed": "#E74856",
            "brightWhite": "#F2F2F2",
            "brightYellow": "#F9F1A5",
            "cursorColor": "#FFFFFF",
            "cyan": "#3A96DD",
            "foreground": "#BFBFBF",
            "green": "#00A400",
            "name": "GitBash",
            "purple": "#BF00BF",
            "red": "#BF0000",
            "selectionBackground": "#FFFFFF",
            "white": "#FFFFFF",
            "yellow": "#BFBF00"
        },
        {
            "background": "#282C34",
            "black": "#282C34",
            "blue": "#61AFEF",
            "brightBlack": "#5A6374",
            "brightBlue": "#61AFEF",
            "brightCyan": "#56B6C2",
            "brightGreen": "#98C379",
            "brightPurple": "#C678DD",
            "brightRed": "#E06C75",
            "brightWhite": "#DCDFE4",
            "brightYellow": "#E5C07B",
            "cursorColor": "#FFFFFF",
            "cyan": "#56B6C2",
            "foreground": "#DCDFE4",
            "green": "#98C379",
            "name": "One Half Dark",
            "purple": "#C678DD",
            "red": "#E06C75",
            "selectionBackground": "#FFFFFF",
            "white": "#DCDFE4",
            "yellow": "#E5C07B"
        },
        {
            "background": "#FAFAFA",
            "black": "#383A42",
            "blue": "#0184BC",
            "brightBlack": "#4F525D",
            "brightBlue": "#61AFEF",
            "brightCyan": "#56B5C1",
            "brightGreen": "#98C379",
            "brightPurple": "#C577DD",
            "brightRed": "#DF6C75",
            "brightWhite": "#FFFFFF",
            "brightYellow": "#E4C07A",
            "cursorColor": "#4F525D",
            "cyan": "#0997B3",
            "foreground": "#383A42",
            "green": "#50A14F",
            "name": "One Half Light",
            "purple": "#A626A4",
            "red": "#E45649",
            "selectionBackground": "#FFFFFF",
            "white": "#FAFAFA",
            "yellow": "#C18301"
        },
        {
            "background": "#002B36",
            "black": "#002B36",
            "blue": "#268BD2",
            "brightBlack": "#073642",
            "brightBlue": "#839496",
            "brightCyan": "#93A1A1",
            "brightGreen": "#586E75",
            "brightPurple": "#6C71C4",
            "brightRed": "#CB4B16",
            "brightWhite": "#FDF6E3",
            "brightYellow": "#657B83",
            "cursorColor": "#FFFFFF",
            "cyan": "#2AA198",
            "foreground": "#839496",
            "green": "#859900",
            "name": "Solarized Dark",
            "purple": "#D33682",
            "red": "#DC322F",
            "selectionBackground": "#FFFFFF",
            "white": "#EEE8D5",
            "yellow": "#B58900"
        },
        {
            "background": "#FDF6E3",
            "black": "#002B36",
            "blue": "#268BD2",
            "brightBlack": "#073642",
            "brightBlue": "#839496",
            "brightCyan": "#93A1A1",
            "brightGreen": "#586E75",
            "brightPurple": "#6C71C4",
            "brightRed": "#CB4B16",
            "brightWhite": "#FDF6E3",
            "brightYellow": "#657B83",
            "cursorColor": "#002B36",
            "cyan": "#2AA198",
            "foreground": "#657B83",
            "green": "#859900",
            "name": "Solarized Light",
            "purple": "#D33682",
            "red": "#DC322F",
            "selectionBackground": "#FFFFFF",
            "white": "#EEE8D5",
            "yellow": "#B58900"
        },
        {
            "background": "#000000",
            "black": "#000000",
            "blue": "#3465A4",
            "brightBlack": "#555753",
            "brightBlue": "#729FCF",
            "brightCyan": "#34E2E2",
            "brightGreen": "#8AE234",
            "brightPurple": "#AD7FA8",
            "brightRed": "#EF2929",
            "brightWhite": "#EEEEEC",
            "brightYellow": "#FCE94F",
            "cursorColor": "#FFFFFF",
            "cyan": "#06989A",
            "foreground": "#D3D7CF",
            "green": "#4E9A06",
            "name": "Tango Dark",
            "purple": "#75507B",
            "red": "#CC0000",
            "selectionBackground": "#FFFFFF",
            "white": "#D3D7CF",
            "yellow": "#C4A000"
        },
        {
            "background": "#FFFFFF",
            "black": "#000000",
            "blue": "#3465A4",
            "brightBlack": "#555753",
            "brightBlue": "#729FCF",
            "brightCyan": "#34E2E2",
            "brightGreen": "#8AE234",
            "brightPurple": "#AD7FA8",
            "brightRed": "#EF2929",
            "brightWhite": "#EEEEEC",
            "brightYellow": "#FCE94F",
            "cursorColor": "#000000",
            "cyan": "#06989A",
            "foreground": "#555753",
            "green": "#4E9A06",
            "name": "Tango Light",
            "purple": "#75507B",
            "red": "#CC0000",
            "selectionBackground": "#FFFFFF",
            "white": "#D3D7CF",
            "yellow": "#C4A000"
        },
        {
            "background": "#000000",
            "black": "#000000",
            "blue": "#000080",
            "brightBlack": "#808080",
            "brightBlue": "#0000FF",
            "brightCyan": "#00FFFF",
            "brightGreen": "#00FF00",
            "brightPurple": "#FF00FF",
            "brightRed": "#FF0000",
            "brightWhite": "#FFFFFF",
            "brightYellow": "#FFFF00",
            "cursorColor": "#FFFFFF",
            "cyan": "#008080",
            "foreground": "#C0C0C0",
            "green": "#008000",
            "name": "Vintage",
            "purple": "#800080",
            "red": "#800000",
            "selectionBackground": "#FFFFFF",
            "white": "#C0C0C0",
            "yellow": "#808000"
        }
    ]
}添加右键快捷方式,方便后面编辑文档
在 scoop 安装 wt、vscode 等程序成功后,会提示执行软件提供的注册表修改脚本,就能将 wt 添加到右键菜单,也可以参考下文,自定义内容
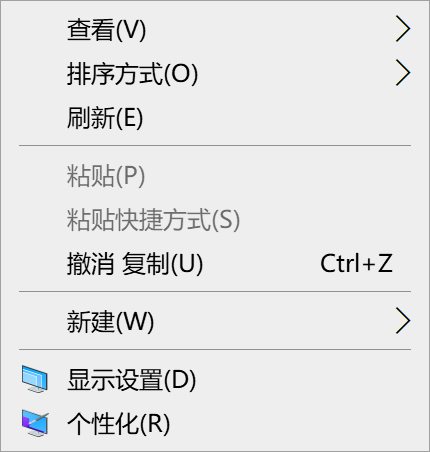
默认右键
需要替换文件路径、wt.exe -p %变量名需要和wt的settings.json一致%
脚本需要保存为 .reg 格式之后执行
Windows Registry Editor Version 5.00

[HKEY_CLASSES_ROOT\Directory\Background\shell\wt-cmd]
 @="Open CMD Using WT Here"
 "Icon"="C:\\Users\\1062\\AppData\\Local\\ico\\cmd.ico"

[HKEY_CLASSES_ROOT\Directory\Background\shell\wt-cmd\command]
 @="C:\\Users\\1062\\scoop\\apps\\windows-terminal\\current\\wt.exe -p cmd -d ."


[HKEY_CLASSES_ROOT\Directory\Background\shell\wt-gitbash]
 @="Open Git Bash Using WT Here"
 "Icon"="C:\\Users\\1062\\AppData\\Local\\ico\\git.ico"

[HKEY_CLASSES_ROOT\Directory\Background\shell\wt-gitbash\command]
 @="C:\\Users\\1062\\scoop\\apps\\windows-terminal\\current\\wt.exe -p GitBash -d ."


[HKEY_CLASSES_ROOT\Directory\Background\shell\wt-ps]
 @="Open PowerShell Using WT Here"
 "Extended"=""
 "Icon"="C:\\Users\\1062\\AppData\\Local\\ico\\ps.ico"

[HKEY_CLASSES_ROOT\Directory\Background\shell\wt-ps\command]
 @="C:\\Users\\1062\\scoop\\apps\\windows-terminal\\current\\wt.exe -p PowerShell -d ."


[HKEY_CLASSES_ROOT\*\shell\scoop-vscode]
@="Open with Code"
"Icon"="C:\\Users\\1062\\scoop\\apps\\vscode\\current\\Code.exe"
[HKEY_CLASSES_ROOT\*\shell\scoop-vscode\command]
@="\"C:\\Users\\1062\\scoop\\apps\\vscode\\current\\Code.exe\" \"%1\""

[HKEY_CLASSES_ROOT\Directory\shell\scoop-vscode]
@="Open with Code"
"Icon"="C:\\Users\\1062\\scoop\\apps\\vscode\\current\\Code.exe"
[HKEY_CLASSES_ROOT\Directory\shell\scoop-vscode\command]
@="\"C:\\Users\\1062\\scoop\\apps\\vscode\\current\\Code.exe\" \"%V\""

[HKEY_CLASSES_ROOT\Directory\Background\shell\scoop-vscode]
@="Open with Code"
"Icon"="C:\\Users\\1062\\scoop\\apps\\vscode\\current\\Code.exe"
[HKEY_CLASSES_ROOT\Directory\Background\shell\scoop-vscode\command]
@="\"C:\\Users\\1062\\scoop\\apps\\vscode\\current\\Code.exe\" \"%V\""

[HKEY_CLASSES_ROOT\Directory\Background\shell\scoop-vscode]
@="Open with Code"
"Icon"="C:\\Users\\1062\\scoop\\apps\\vscode\\current\\Code.exe"
[HKEY_CLASSES_ROOT\Directory\Background\shell\scoop-vscode\command]
@="\"C:\\Users\\1062\\scoop\\apps\\vscode\\current\\Code.exe\" \"%V\""
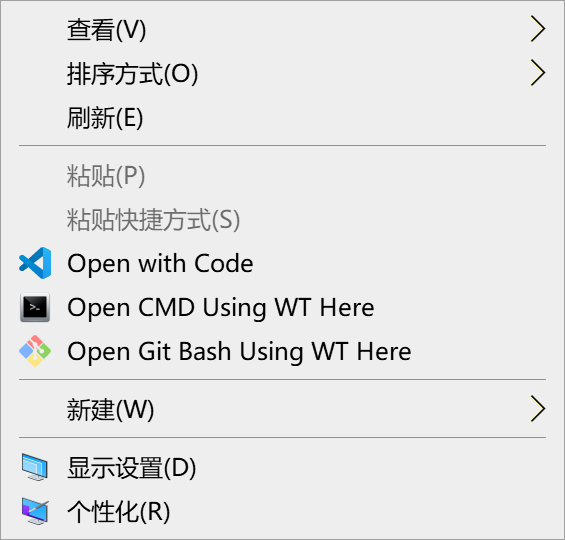
完成版右键菜单
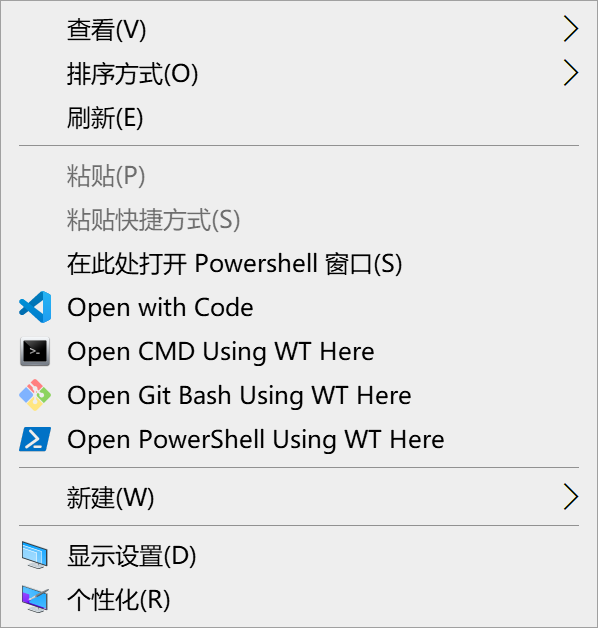
按住 shift 后的右键菜单
Typora 换主题,官网下载 bluebook
注释 bluebook.css :426,防止代码段序号和内容之间的巨大缩进
免费版:上传流量1G/月 下载流量3G/月
不想同步的文件夹会采用云桥模式,用到才下载
本地未删除备份可以直接进行文件比对,可能需要处理文件冲突
个人在用 WPS,开通了会员,同时解决了 office、看图、看 PDF 的需求,还有云服务自动同步文档
一键安装,一键同步配置、插件 超赞!基础版已经够用了,不建议上网找破解版,财力雄厚也可以考虑付费使用
使用 IDEA 自带
用个人的配置文件覆盖全局的,仓库地址一般放到C盘外
%user_home%\.m2\settings.xml
D:\dev\.m2\repository
Install
windows 10 及以上版本的系统自带openssh,可以先在命令行输入 ssh-keygen 测试一下是否生效,如果有则无需再安装。
First up, install the programs you need:
scoop install git opensshCreate a private key
If you don't already have an SSH key, you can create one like this:
PS> ssh-keygen
Generating public/private rsa key pair.
Enter file in which to save the key (/c/Users/you//.ssh/id_rsa): [press enter]
Enter passphrase (empty for no passphrase): [type your password]
Enter same passphrase again: [and once more]
...
Then add your SSH key to GitHub.
Test it out
To make sure everything's working, run:
ssh -T [email protected]After a warning or two, you should see a message like this:
Hi <username>! You've successfully authenticated, but GitHub does not provide shell access.
nvm(Node Version Manager) & nodejs
scoop search nvm
scoop install nvm
nvm v
nvm install lts
nvm current
# use 指令必须要用管理员权限执行,不然会报 exit code 1 错误
sudo nvm use $version$
npm
npm config list //查看基本配置
npm config list -l //查看所有配置

# 获取全局安装的默认目录
npm config get prefix
# 设置全局安装的默认目录
npm config set prefix "D:\dev\nodejs\node_global"
npm config set cache "D:\dev\nodejs\node_cache"
# 在全局目录下安装一个npm,然后就不用node自带的npm了
npm install npm -g
系统变量 -> 新建变量NODE_PATH :D:\dev\nodejs\node_global\node_modules
用户变量 -> Path 添加 D:\dev\nodejs\node_global
现在执行 npm -v 会发现已经是全局目录下的npm了
安装cnpm
npm install cnpm -g --registry=https://registry.npmmirror.com安装nrm(npm registry manager) NPM的镜像源管理工具
npm install nrm -g
nrm ls
nrm test
# 根据test结果选择最快的镜像源
nrm use tencent目前国内主流还是5.7版本,建议优先使用,本人在使用8遇到种种小问题之后终于坚持不住了,退回5.7
安装完毕先修改 my.ini 配置文件,然后安装服务,初始化 MySQL,登录改密码
tips: 在 linux 系统下用包管理工具安装 MySQL 时,想要修改默认配置项,例如忽略大小写,可以先创建配置文件,写入配置项,这样在安装时,会采用自定义的配置
# 安装MySQL服务
sudo mysqld --install MySQL --defaults-file="C:\Users\1062\scoop\apps\mysql\current\my.ini"
# 执行初始化
sudo mysqld --initialize
# 启动MySQL服务
sudo net start mysql
# 此版本登录密码为空,直接登录
mysql -u root
ALTER USER "root"@"localhost" IDENTIFIED  BY "你的新密码";(mysql8)
SET PASSWORD FOR root@localhost=PASSWORD('your password');(mysql5.7)
exit

# To stop and/or delete the Service run 'sc stop MySQL' and 'sc delete MySQL'.# 安装 miniconda3
scoop install miniconda3.condarc 文件
channels:
  - conda-forge
show_channel_urls: true
auto_activate_base: false
custom_channels:
  conda-forge: https://mirrors.bfsu.edu.cn/anaconda/cloud
  msys2: https://mirrors.bfsu.edu.cn/anaconda/cloud
  bioconda: https://mirrors.bfsu.edu.cn/anaconda/cloud
  menpo: https://mirrors.bfsu.edu.cn/anaconda/cloud
  pytorch: https://mirrors.bfsu.edu.cn/anaconda/cloud
simpleitk: https://mirrors.bfsu.edu.cn/anaconda/cloud参考此文章https://blog.csdn.net/baidu_20876831/article/details/119540563
scoop search redis
# 需要安装到全局才能注册服务,否则权限不够
sudo scoop install redis -g

# 注册服务
redis-server.exe --service-install redis.windows.conf --loglevel verbose
# 卸载服务
redis-server --service-uninstall
# 启动服务
redis-server --service-start
亦可选择投身 WSL 的怀抱
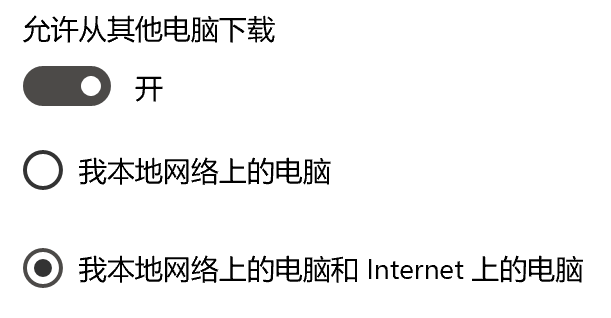
设置 -> 更新和安全 -> 传递优化
# 先用 wsl试下有没有开启wsl服务,没有就执行指令开启,需要重启电脑
sudo Enable-WindowsOptionalFeature -Online -FeatureName Microsoft-Windows-Subsystem-Linux
# PowerShell 启用代理, clash 开启系统代理
[net.webrequest]::defaultwebproxy = new-object net.webproxy "127.0.0.1:7890"
sudo wsl --install -d Debian

# wt settings.json
{
    "guid": "{58ad8b0c-3ef8-5f4d-bc6f-13e4c00f2530}",
    "hidden": false,
    "name": "Debian",
    "icon": "C:\\Users\\1062\\AppData\\Local\\ico\\debian.ico",
    "source": "Windows.Terminal.Wsl"
}
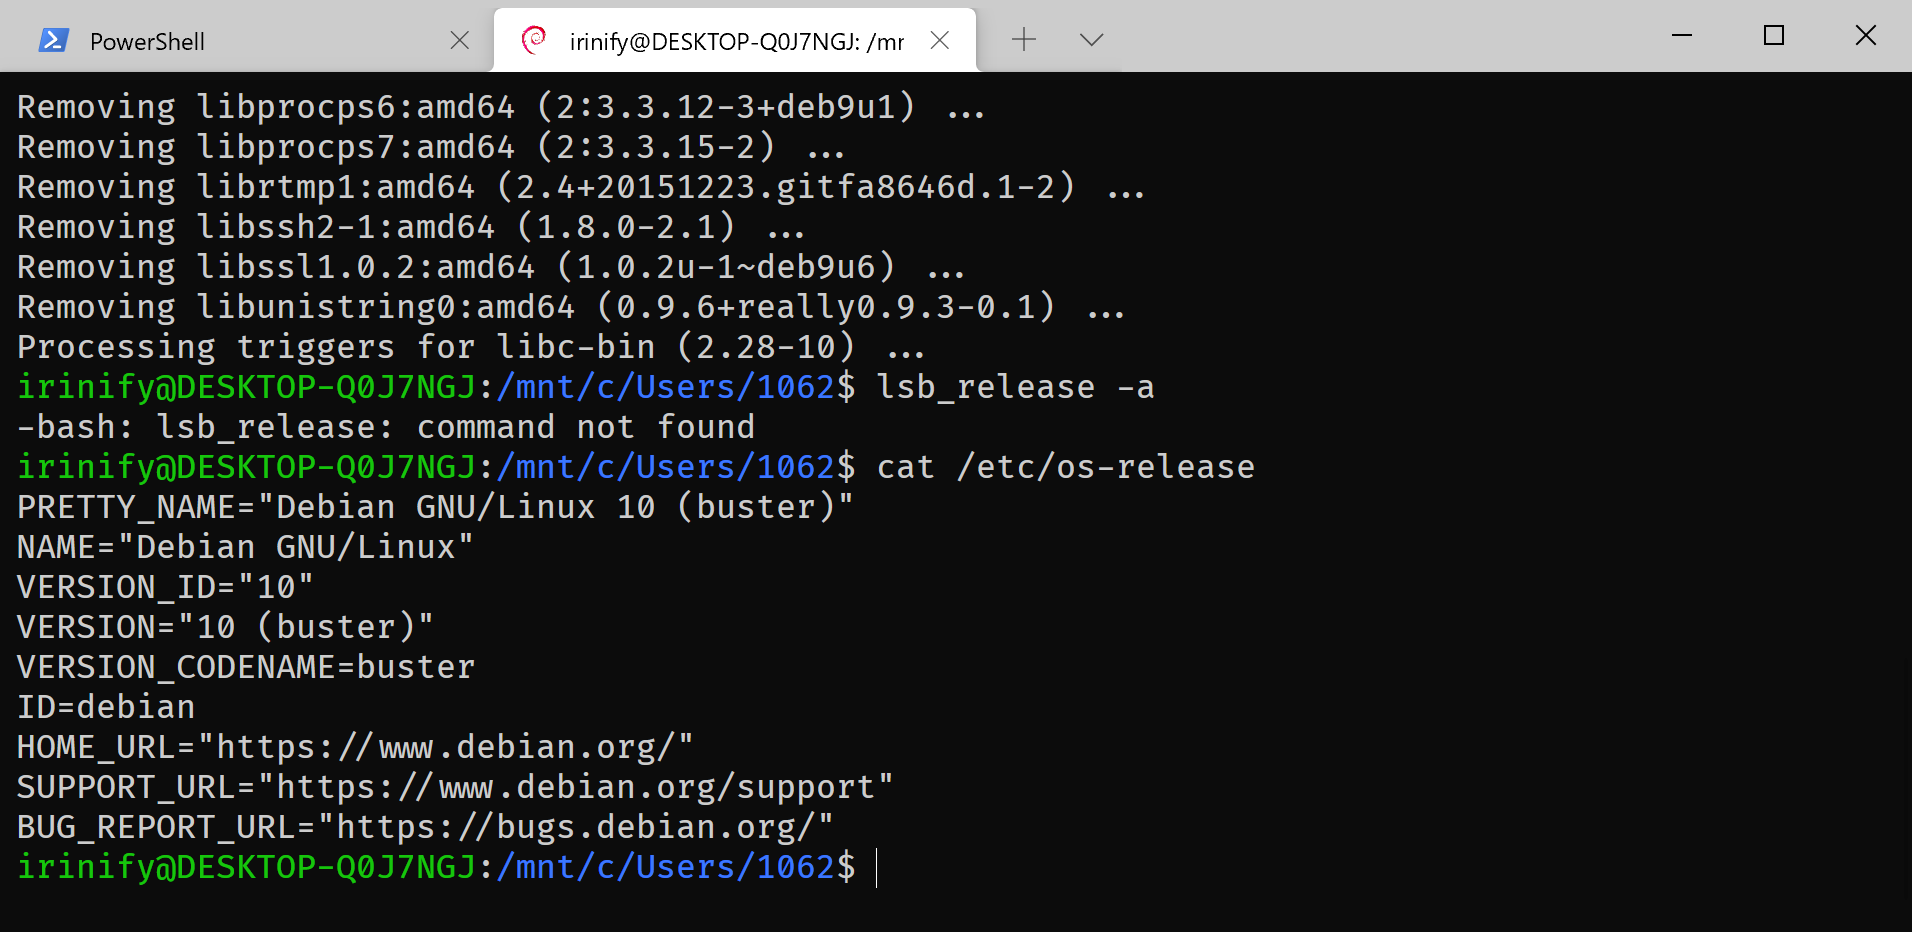
wsl 安装的 Debian 是v9.13,手动升级到10
使用清华源
# 安装 https 支持工具
sudo apt install apt-transport-https ca-certificates

cd /etc/apt
# 备份
sudo cp sources.list sources.list.bak
# 替换内容
# 默认注释了源码镜像以提高 apt update 速度,如有需要可自行取消注释
deb https://mirrors.tuna.tsinghua.edu.cn/debian/ stretch main contrib non-free
# deb-src https://mirrors.tuna.tsinghua.edu.cn/debian/ stretch main contrib non-free
deb https://mirrors.tuna.tsinghua.edu.cn/debian/ stretch-updates main contrib non-free
# deb-src https://mirrors.tuna.tsinghua.edu.cn/debian/ stretch-updates main contrib non-free

deb https://mirrors.tuna.tsinghua.edu.cn/debian/ stretch-backports main contrib non-free
# deb-src https://mirrors.tuna.tsinghua.edu.cn/debian/ stretch-backports main contrib non-free

deb https://mirrors.tuna.tsinghua.edu.cn/debian-security stretch/updates main contrib non-free
# deb-src https://mirrors.tuna.tsinghua.edu.cn/debian-security stretch/updates main contrib non-free

# 全量更新
sudo apt-get update && sudo apt-get upgrade
系统升级
# 将/etc/apt/sources.list里所有“stretch”替换为“buster”
sudo sed -i 's/stretch/buster/g' /etc/apt/sources.list
sudo apt-get update && sudo apt-get upgrade
sudo apt-get dist-upgrade
通过powershell 重启 wsl 服务
sudo net stop LxssManager
sudo net start LxssManager
重启之后,清理旧有软件
sudo apt-get autoremove

# 查看版本信息
cat /etc/os-releaseInstall and Test Redis:
-
Launch the installed distro from your Windows Store and then install redis-server. The following example works with Ubuntu (you’ll need to wait for initialization and create a login upon first use):
> sudo apt-get update
> sudo apt-get upgrade
> sudo apt-get install redis-server
> redis-cli -v
-
Restart the Redis server to make sure it is running:
> sudo service redis-server restart -
Execute a simple Redis command to verify your Redis server is running and available:
$ redis-cli
127.0.0.1:6379> set user:1 "Oscar"
127.0.0.1:6379> get user:1
"Oscar"
-
To stop your Redis server:
> sudo service redis-server stop
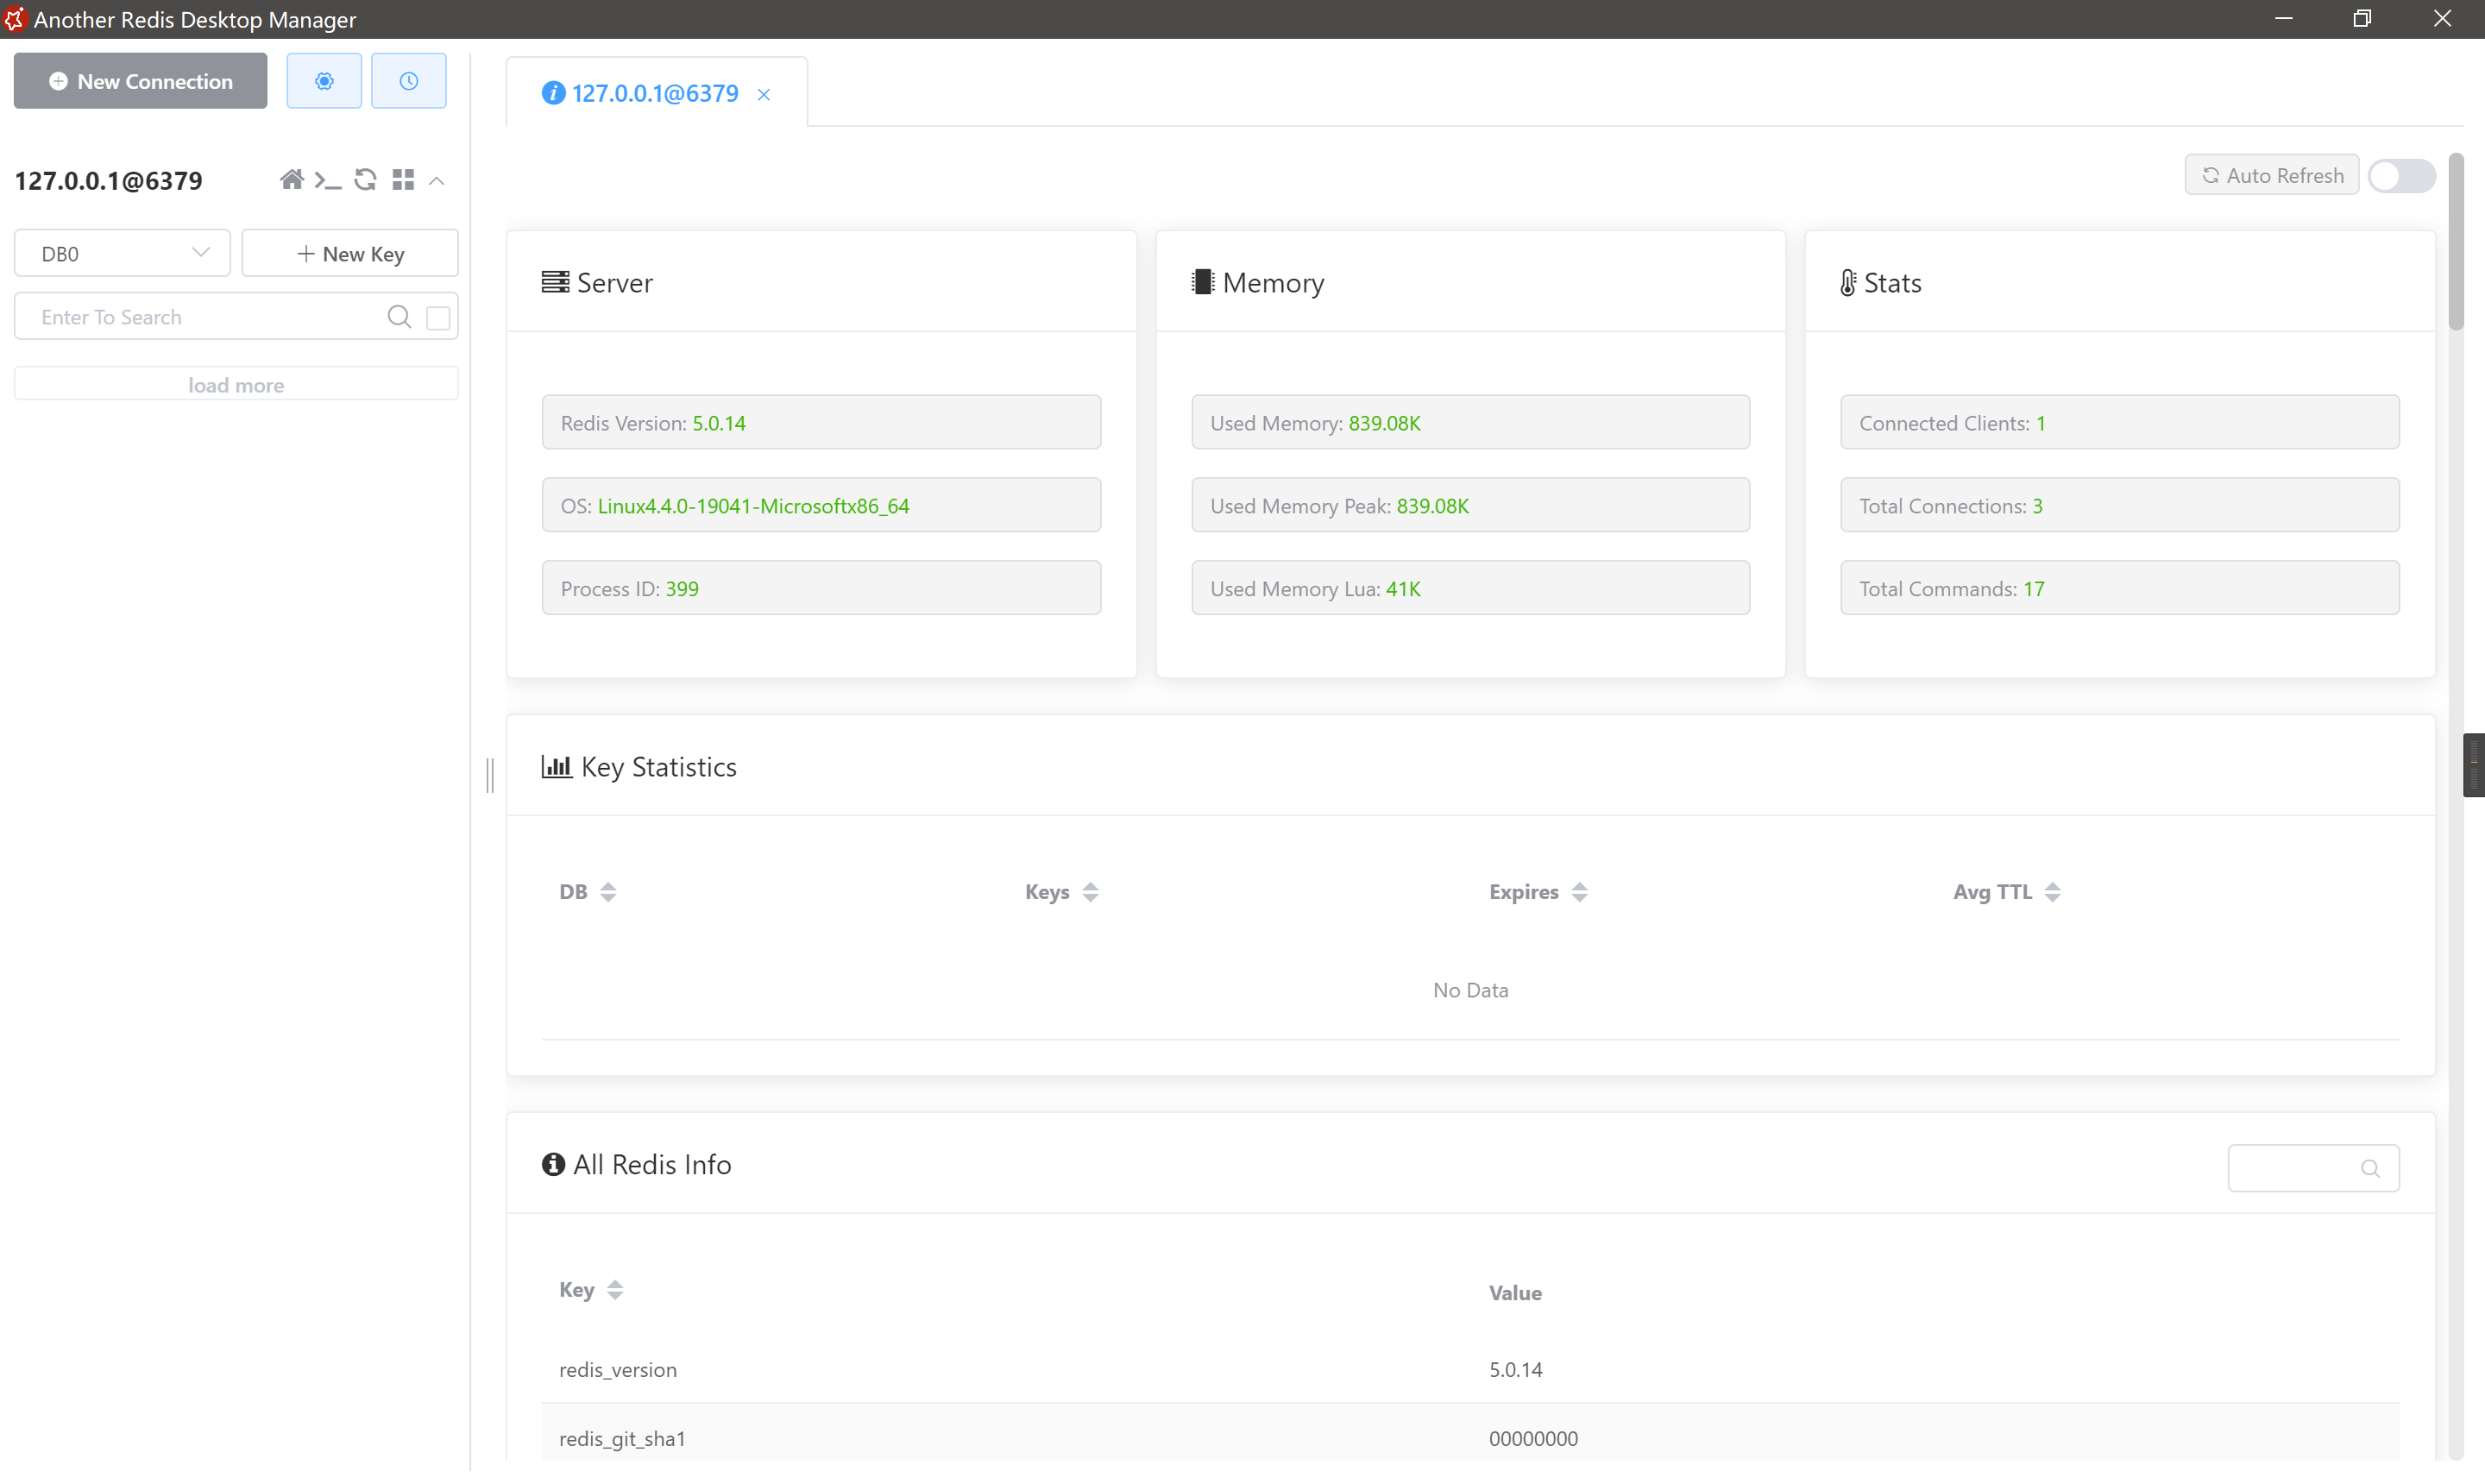
从 github 下载 Another Redis Desktop Manager
建议通过 scoop 安装
scoop install another-redis-desktop-manager
尝试连接,成了!
redis 还不能自启,需要在 powershell 启动 wsl 中的 redis-server
wsl -d Debian -u root /etc/init.d/redis-server start
