Tip
Already an experienced programmer but new to ubuntu yaru flutter apps? Skip the tutorials and clone one of our template repositories, created with best practices, client side decorations, rounded bottom corners and CI in place, and take them as a starting point:
| Calculator | Licenses | Numbers |
|---|---|---|
 |
 |
 |
Tip
TL;DR. Version without Explanation
flutter pub add yaruflutter pub add handy_window- Modify
linux/my_application.ccto register plugins before showing the Flutter window and view:
diff --git a/linux/my_application.cc b/linux/my_application.cc
index fa74baa..3133755 100644
--- a/linux/my_application.cc
+++ b/linux/my_application.cc
@@ -48,17 +48,17 @@ static void my_application_activate(GApplication* application) {
   }

   gtk_window_set_default_size(window, 1280, 720);
-  gtk_widget_show(GTK_WIDGET(window));

   g_autoptr(FlDartProject) project = fl_dart_project_new();
   fl_dart_project_set_dart_entrypoint_arguments(project, self->dart_entrypoint_arguments);

   FlView* view = fl_view_new(project);
-  gtk_widget_show(GTK_WIDGET(view));
   gtk_container_add(GTK_CONTAINER(window), GTK_WIDGET(view));

   fl_register_plugins(FL_PLUGIN_REGISTRY(view));

+  gtk_widget_show(GTK_WIDGET(window));
+  gtk_widget_show(GTK_WIDGET(view));
   gtk_widget_grab_focus(GTK_WIDGET(view));
}- add
before
await YaruWindowTitleBar.ensureInitialized();
runApp - Wrap your MaterialApp with YaruTheme and use the
yaru.themeandyaru.darkThemelike so:import 'package:flutter/material.dart'; import 'package:yaru/yaru.dart'; Future<void> main() async { await YaruWindowTitleBar.ensureInitialized(); runApp(const MyApp()); } class MyApp extends StatelessWidget { const MyApp({super.key}); @override Widget build(BuildContext context) { return YaruTheme(builder: (context, yaru, child) { return MaterialApp( debugShowCheckedModeBanner: false, // <------------- theme: yaru.theme, // <----------- darkTheme: yaru.darkTheme, // <------------- home: Scaffold( appBar: const YaruWindowTitleBar(), // <------------- ), ); }); } }
- Check out our Widgets in our Web-App
This is a beginner tutorial for those new to the Dart programming language, new to programming languages in general and new to the Yaru design.
The preinstalled applications on Ubuntu are quite diverse in their programming language and tooling origins. Some examples are the Firefox internet browser and the Thunderbird e-mail client both being C++ and JavaScript applications, the Libre-Office suite being written in C++, XML, and Java and gnome-files (A.K.A. nautilus) which is written in C with gtk.
Another toolkit is Flutter. Flutter is a multi platform toolkit written in C++ and dart. The GUI of the new Ubuntu Desktop installer is made Flutter as well as the next iteration of Ubuntu Software plus there are hundreds of iOS, Android, Windows, Web and MacOS applications created with Flutter.
Over the past years the ubuntu-flutter-community and canonical designed and developed several dart libraries which make it easy to create Ubuntu Desktop applications with Flutter. This tutorial will make all of this less mystical for people not familiar with neither Flutter nor our dart libraries.
- How to setup your Flutter development environment on Ubuntu
- Learn VsCode basics
- Get to know dart libraries to create an aesthetic and visually consistent desktop application
- Create a starting point for either a multi-page, single-page or wizard-like desktop applications on Ubuntu
It should be an advantage if you have created an application before, preferable with an object oriented language and if you are not scared to copy and paste commands into your terminal. But since this is a step-by-step, hands-on tutorial everyone with a bit of technical interest should do fine.
If you want to create Android or Web applications with Flutter from your Ubuntu machine, all you need should be the flutter snap (snap install flutter --classic). However, this tutorial is about creating apps for the Ubuntu Desktop. Some of our dart libraries make use of native libraries which may not behave perfectly with the way the flutter snap interacts with your system.
The following lines will install the dependencies for Flutter Linux apps, create a directory in your home dir, clone the flutter git repository and export the flutter and dart commands to your path so you can run it from any user shell.
-
So please open up your terminal on Ubuntu by either pressing the key-combination CTRL + ALT + T or by searching for "Terminal" in your Ubuntu search. And...
...either copy & paste the following lines successively into your terminal and press enter after:
sudo apt install git curl cmake meson make clang libgtk-3-dev pkg-config
mkdir -p ~/development
cd ~/development
git clone https://github.com/flutter/flutter.git -b stable
echo 'export PATH="$PATH:$HOME/development/flutter/bin"' >> ~/.bashrc
source ~/.bashrc
OR use this one-liner to copy and paste everything into your terminal,
⚠️ this does not stop until it is done:sudo apt -y install git curl cmake meson make clang libgtk-3-dev pkg-config && mkdir -p ~/development && cd ~/development && git clone https://github.com/flutter/flutter.git -b stable && echo 'export PATH="$PATH:$HOME/development/flutter/bin"' >> ~/.bashrc && source ~/.bashrc
-
Run the following command to install VsCode on your Ubuntu machine (or install it from Ubuntu Software):
sudo snap install code --classic
-
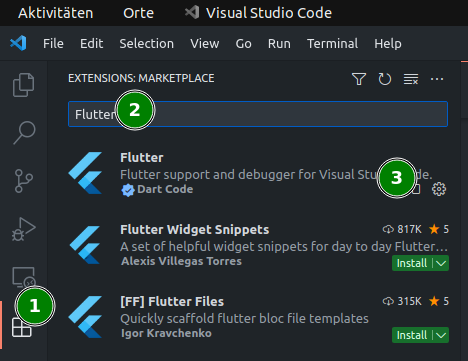
Open VsCode, click on the extension icon in the left sidebar (1), type "Flutter" and click "Install" on the first entry (3), this should be the Flutter extension by Dart Code.
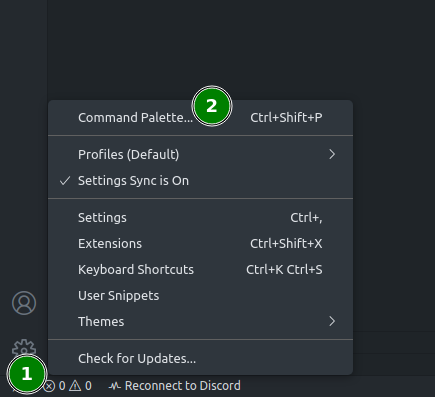
VsCode offers a command palette which you can open with either CTRL+SHIFT+P or by clicking on the ⚙️ icon
We could now type "Flutter new project", but we don't!
However, since we want to make amount of auto created files as small as possible to make the management as easy as possible, we want to specify the platforms for our new project.
-
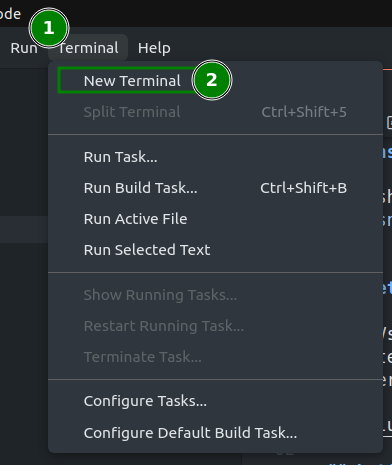
Open the integrated terminal in vscode if it is not already opened
-
And run the following command to create a new Flutter project for Linux only (you can add more platforms at any point if you want) and specify the name of your organization/company and your appname:
flutter create --platforms=linux --org com.test my_yaru_app
-
Flutter created a small template app for us. Let's take a look at the three locations we need to visit first:
(1) Is the
libdirectory where all of our dart code lives. For now a singlemain.dartfile should be enough. All platforms our app wants to be available for gets its own directory. In our case only theLinuxdirectory (2). We will come this back later. To define metadata of our app and the dependencies we want to use we need thepubspec.yamlfile (3).
-
Now click on
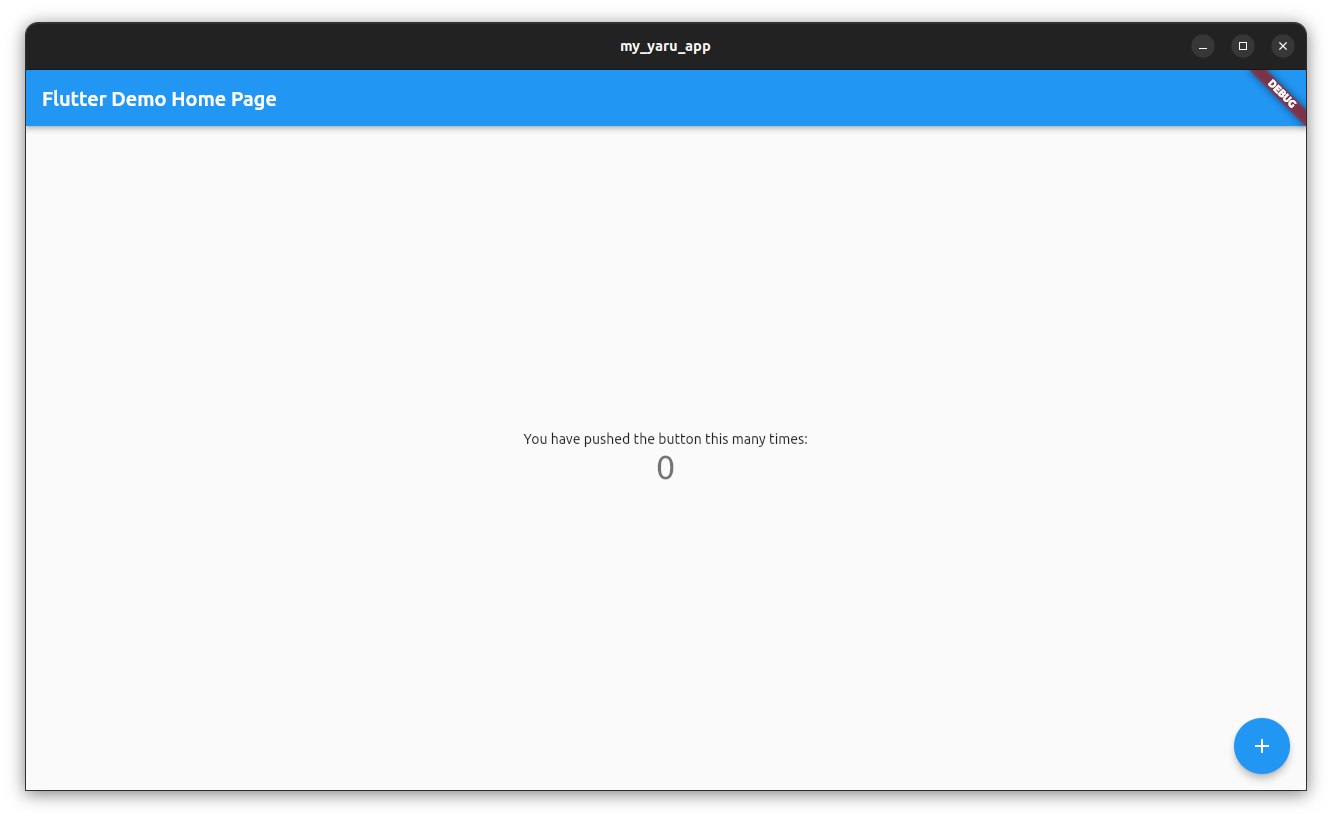
main.dart(1) to open the file in your editor and click on the smallRunlabel above thevoid main()declaration (2) to run the app for the first time
 |
|---|
| (Caution, it is not pretty yet) |
The Flutter template app is quite verbose explaining what it contains but we don't need most of the things in here for now.
Dart will now complain that the class MyApp does not exist any longer. Because we've just deleted it on purpose.
The Flutter VsCode extensions is extremely helpful for almost any task and saves us a lot of lines to write. There are quick commands, snippets, auto-complete and auto fix features available which we will use in this tutorial.
The first help we will use is the snippet stle which is short for StatelessWidget.
-
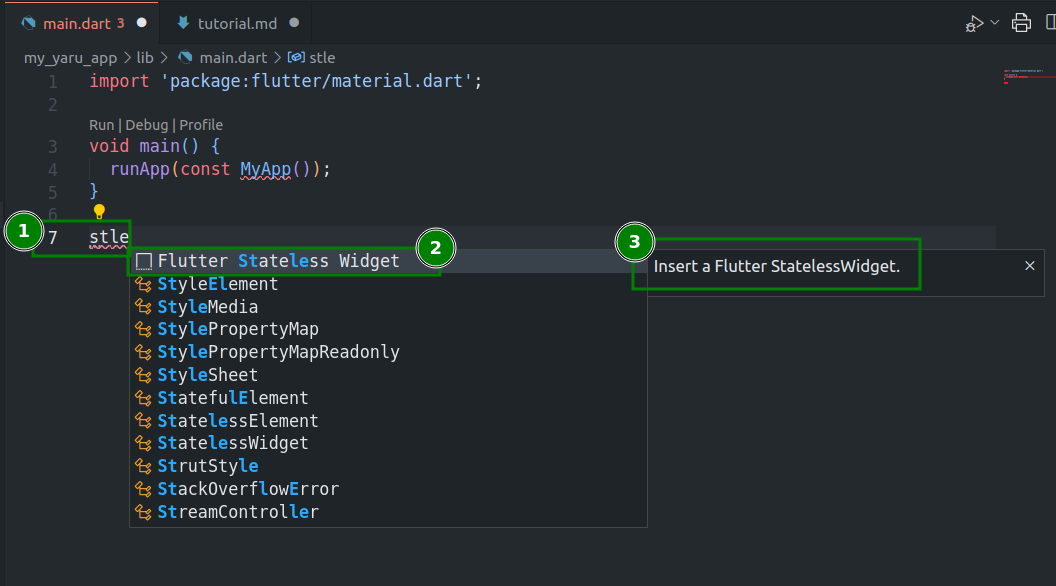
Move below line 5 and write
stle
Now a popup should ... pop-up. (if not press CTRL+ENTER, if this does not help either, there is something wrong with your setup of vscode, flutter and the Flutter VsCode extension).
- (1) is your text and the cursor
- (2) is the detected snippet
Flutter Stateless Widget - (3) is a little explanation what will happen if you press ENTER now, which you please do now:
Something happened! Now please stay calm, take your fingers off the keyboard for a moment and look at what you got.
-
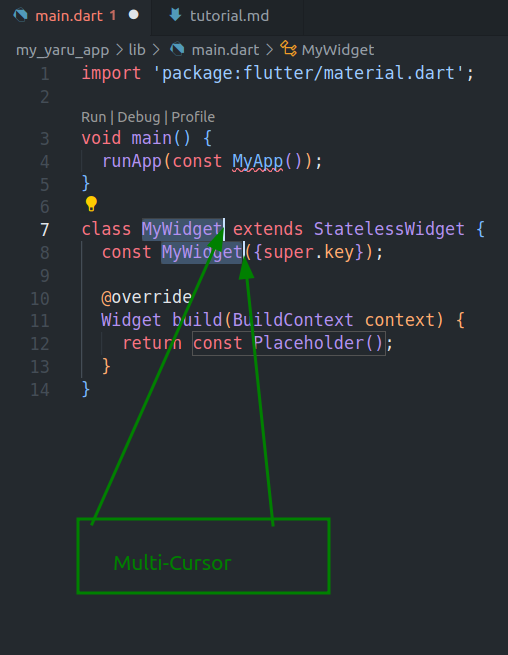
The created snippet left a "multi-cursor" in the places which change if you change the name of your
StatelessWidget. -
Just start writing
MyAppnow and the text will be written into both places at once. When you are done press the ESC key on your keyboard to stop the multi-cursor. Pressing CTRL+S will save your code and the changes will be hot-reloaded immediately into your app:
Every time you save your code by either pressing CTRL+S or by the menu entry File->Save, Flutter will Hot-Reload your changes right into your dart process. This means that you do not need to re-run your app every time you change something in your code. However if you exchange bigger parts you might need to click on Restart (1)
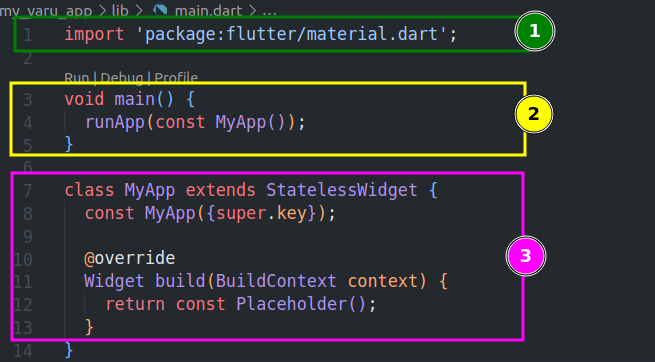
- (1) Imports the package
material.dart - (2) Is the main application with the
runAppfunction call. - (3) Is your class
MyAppwhich extends the classStatelessWidget. Extending this class forces your app to implement theWidget build(BuildContext context)method, which you do by returning the WidgetPlaceHolder.
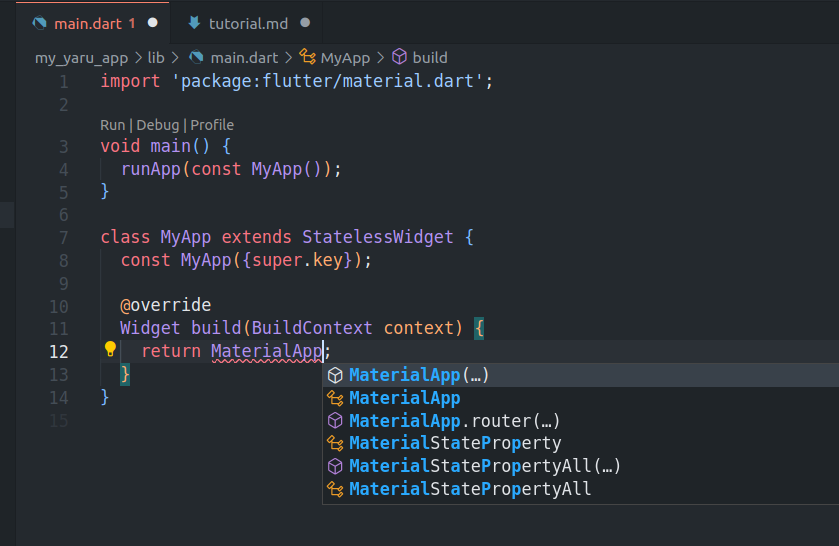
Mark const Placeholder
and write MaterialApp which opens a popup with a suggested class, press ENTER to replace PlaceHolder with MaterialApp()
Don't code now, just read.
Functions in dart, as in any other modern programming language, can either have no or any kind and amount of parameters (also called arguments or input variables). (In mathematics this is different. All functions must have at least one argument and a return value.)
To make reading function calls easier dart has the optional feature of named parameters. Where a function, if defined with (a) named parameter(s), must be called by naming the parameter, followed by a : and the value that should be set.
Example definition without a named parameter:
int incrementByOne(int myParameter) {
    return myParameter + 1;
}
Calling the function:
incrementByOne(3);Example definition with a named parameter:
int incrementByOne({required int myParameter}) {
    return myParameter + 1;
}
Calling the function:
incrementByOne(myParameter: 3);To create an instance of a class one needs to call the constructor "function" (to be concrete "method" because this function is defined inside class).
Flutter widget classes almost always use named parameters, which is increasingly useful the more parameters a Widget has when you call its constructor method.
Example Widget definition:
class _MyNumberWidget extends StatelessWidget {
  // This is the constructor definition
  const _MyNumberWidget({required this.number});
  // This is your parameter of the type integer.
  final int number;

  @override
  Widget build(BuildContext context) {
    // using the parameter to be shown inside the UI
    return Text(number.toString());
  }
}
Somewhere else (where calling functions is allowed):
final Widget myNumberWidget = MyNumberWidget(number: 3)-
Move your cursor inside the brackets of the
MaterialApp()constructor call and inserthome: -
VsCode then suggests:
-
Press enter, and write
Scaffold() -
VsCode then suggests:
-
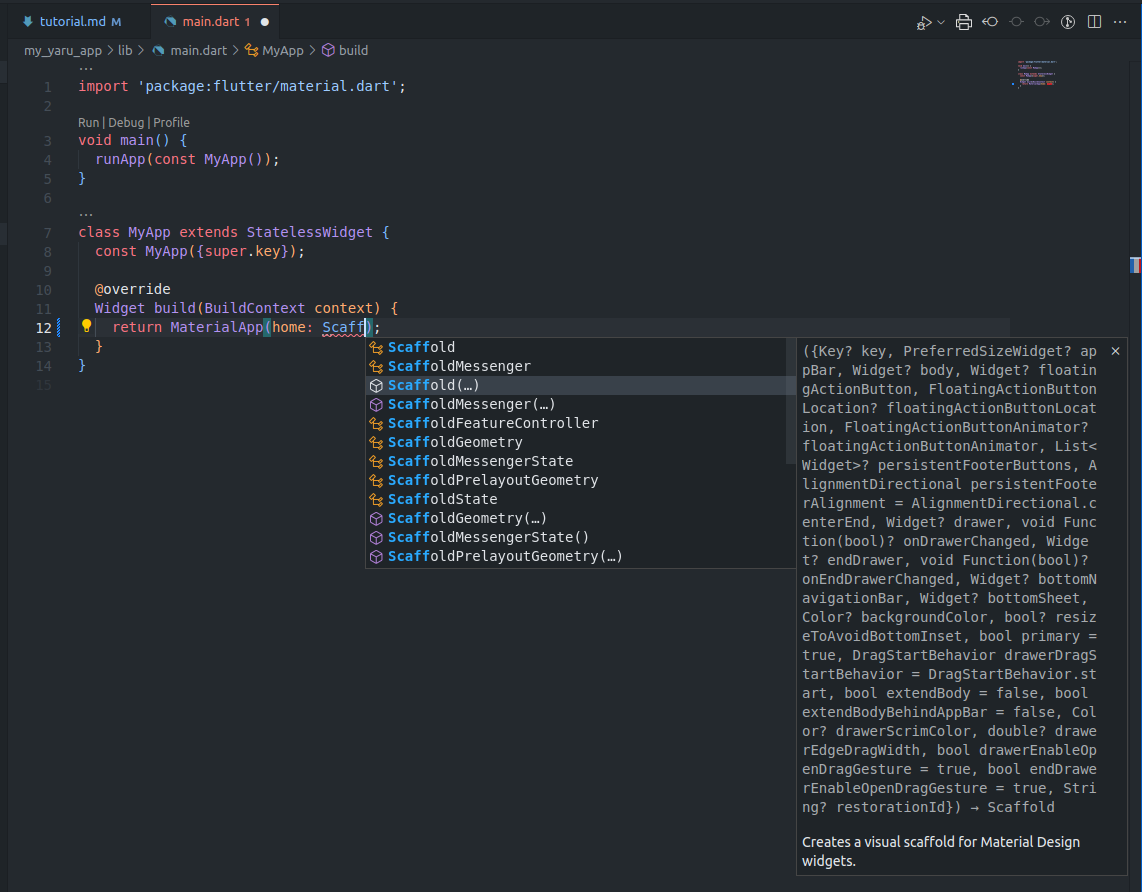
Move the selection to
Scaffold()by pressing your arrow-down key on your keyboard. Press enter whenScaffold()is selected. -
Your code should now look like this:
import 'package:flutter/material.dart';

void main() {
  runApp(const MyApp());
}

class MyApp extends StatelessWidget {
  const MyApp({super.key});

  @override
  Widget build(BuildContext context) {
    return MaterialApp(home: Scaffold());
  }
}
Note: it is always better to let VsCode do the work by only typing until the code-completion (they call it "intellisense") popup shows up with suggestions. Pressing enter while one of the suggestions is selected is always safer because you will avoid typing errors and because VsCode will often also make the necessary import for you, too. However to not make this tutorial unnecessarily long, we won't go through this in every step.
Pub.dev is the server infrastructure by google to host dart and flutter packages and you can use inside your flutter or dart applications by adding them as dependencies to your pubspec.yaml file.
Not all packages on pub.dev are made for Linux but many. You can filter them with the platform=Linux filter. Recommended is also to check the dart3 compatible checkbox to get up to date packages.
https://pub.dev/packages?q=platform%3Alinux+is%3Adart3-compatible
From your development environment, in case of this tutorial VsCode, you can add, update and remove dependencies with the dart pub and flutter pub commands from the terminal.
In VsCode you can also use the command palette that you can open with CTRL+SHIFT+P.
-
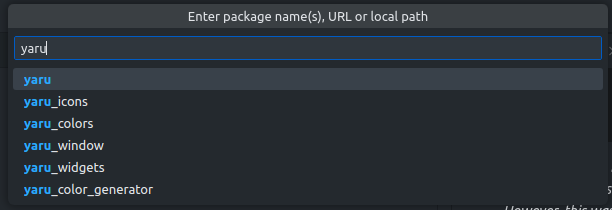
Type
yaruand select theyarupackage by pressing enter. The package will now be added to yourpubspec.yamlfile. -
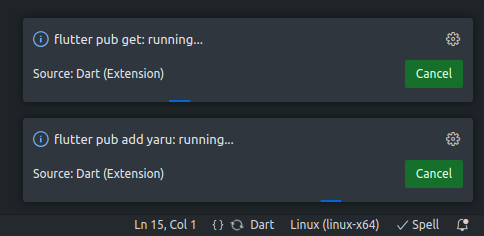
Notice that two tasks are now run by VsCode. Wait until they are done
-
Move your cursor into
MaterialApp -
Press the new key-combination CTRL+., which will open up a new context menu "Quick fix" and move your selection to "Wrap with Builder"
-
Press Enter, and immediately press CTRL+S after, to safe your changes.
Note: Saving your file also let's the VsCode flutter extension magically format your code in the background with the
dart formatcommand. -
Your resulting main.dart should now look like this:
import 'package:flutter/material.dart';

void main() {
  runApp(const MyApp());
}

class MyApp extends StatelessWidget {
  const MyApp({super.key});

  @override
  Widget build(BuildContext context) {
    return Builder(builder: (context) {
      return MaterialApp(home: Scaffold());
    });
  }
}
-
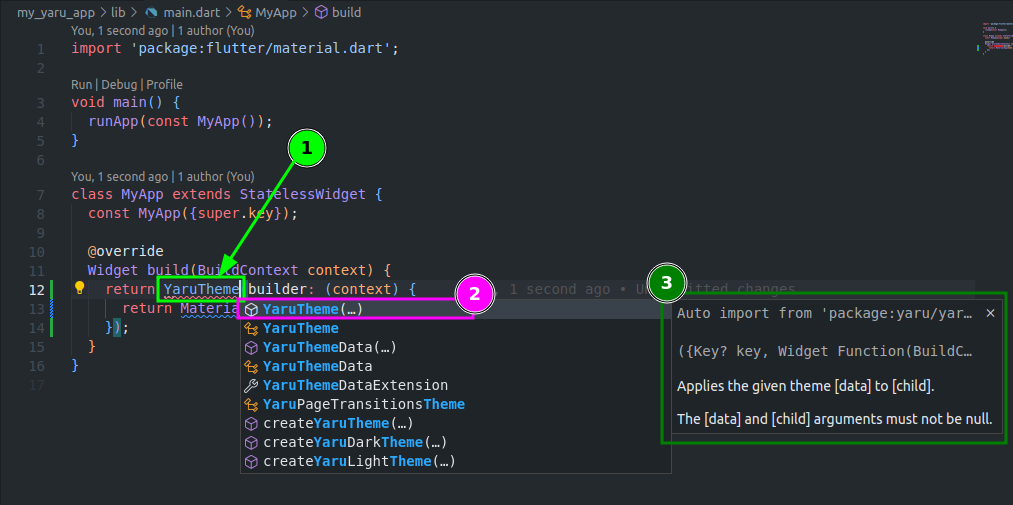
Replace
BuilderwithYaruTheme. A auto-complete context menu will pop up. -
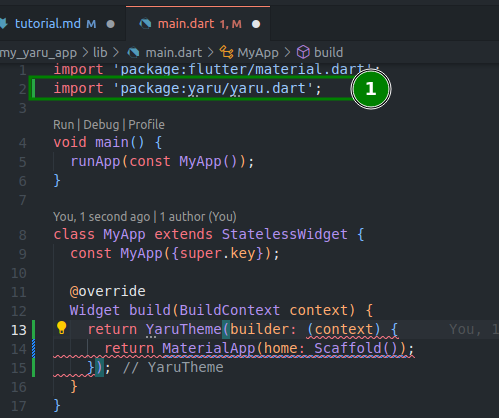
The
yaru.dartpackage is now useable from within yourmain.dartfile because theimport 'package:yaru/yaru.dart';has been added (1) at the top of your file -
The builder callback from
YaruThemeneeds two more parameters: an parameter of the typeYaruThemeDataand of the typeWidget?. -
Add them separated by
,behind thecontextparameter of thebuildercallback ofYaruThemeby writingyaru, child.Your code should now look like this:
import 'package:flutter/material.dart';
import 'package:yaru/yaru.dart';

void main() {
  runApp(const MyApp());
}

class MyApp extends StatelessWidget {
  const MyApp({super.key});

  @override
  Widget build(BuildContext context) {
    return YaruTheme(builder: (context, yaru, child) {
      return MaterialApp(home: Scaffold());
    });
  }
}
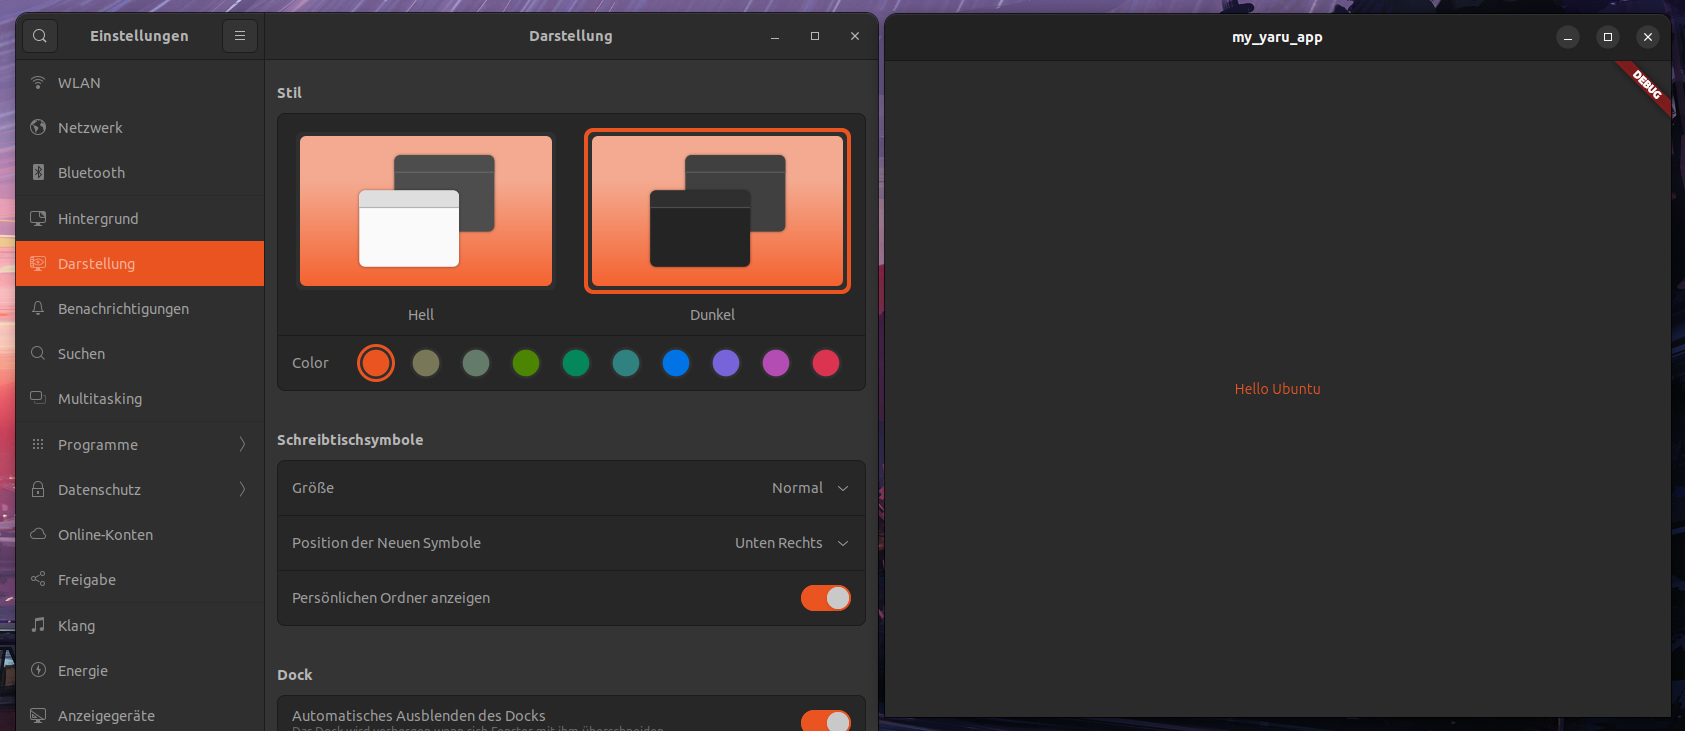
yarucan now be used as a parameter ofMaterialApp, and the flutter app will switch it's accent colors according to what accent color is selected in your Ubuntu settings app. -
Set the theme property of Material app to
yaru.themeand the dark theme property toyaru.darkTheme:import 'package:flutter/material.dart'; import 'package:yaru/yaru.dart'; void main() { runApp(const MyApp()); } class MyApp extends StatelessWidget { const MyApp({super.key}); @override Widget build(BuildContext context) { return YaruTheme(builder: (context, yaru, child) { return MaterialApp( theme: yaru.theme, // <----------- darkTheme: yaru.darkTheme, // <------------- home: Scaffold(), ); }); } }
-
As an evidence that your app's accent color and brightness now follow your system let's add a primary color text in the middle of your
Scaffold.-
Set the
bodyproperty ofScaffoldtoCenter() -
Set the child property of
CentertoText('Hello Ubuntu') -
Set the
styleproperty of theTexttoTextStyle(color: Theme.of(context).primaryColor)Your code should now look like this (but we ain't done yet):
import 'package:flutter/material.dart';
import 'package:yaru/yaru.dart';

void main() {
  runApp(const MyApp());
}

class MyApp extends StatelessWidget {
  const MyApp({super.key});

  @override
  Widget build(BuildContext context) {
    return YaruTheme(builder: (context, yaru, child) {
      return MaterialApp(
        theme: yaru.theme,
        darkTheme: yaru.darkTheme,
        home: Scaffold(
          body: Center(
            child: Text(
              'Hello Ubuntu',
              style: TextStyle(
                color: Theme.of(context).primaryColor,
              ),
            ),
          ),
        ),
      );
    });
  }
}
-
-
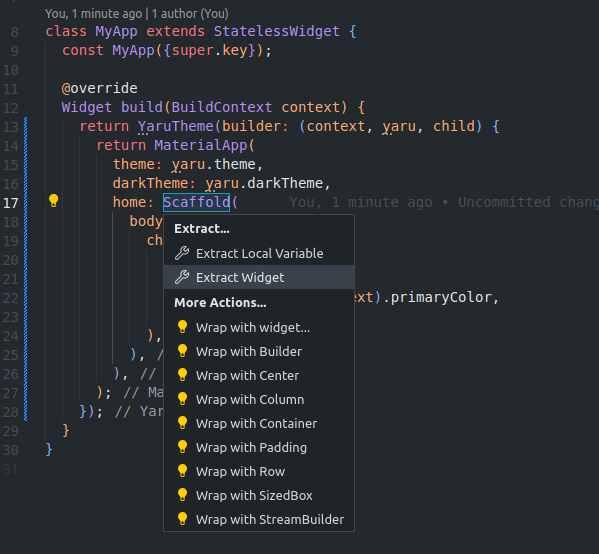
Move your cursor onto
Scaffoldand re-open the quick-fix context menu as before with CTRL+. This time, selectExtract Widget -
and press enter.
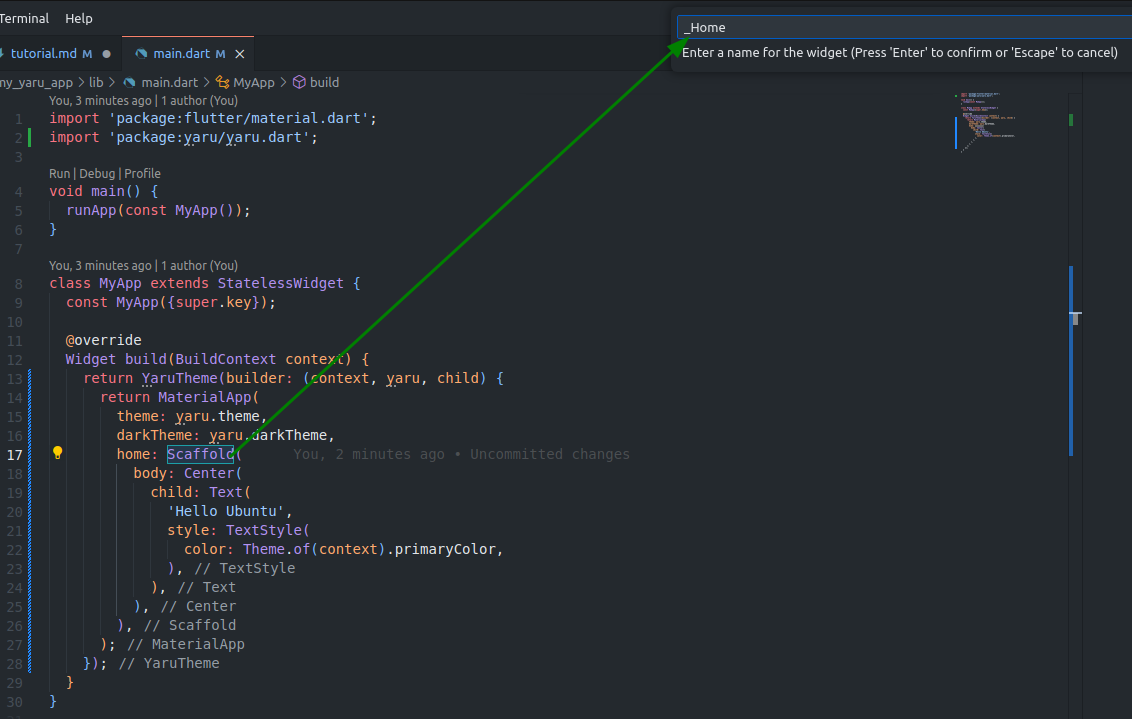
-
Look to the top, a little dialog appeared and asks you how the extracted Widget should be named.
-
Call it
_Home(with a leading underscore): -
Press enter.
Your code should now look like this:
import 'package:flutter/material.dart';
import 'package:yaru/yaru.dart';

void main() {
  runApp(const MyApp());
}

class MyApp extends StatelessWidget {
  const MyApp({super.key});

  @override
  Widget build(BuildContext context) {
    return YaruTheme(builder: (context, yaru, child) {
      return MaterialApp(
        theme: yaru.theme,
        darkTheme: yaru.darkTheme,
        home: _Home(),
      );
    });
  }
}

class _Home extends StatelessWidget {
  const _Home({
    super.key,
  });

  @override
  Widget build(BuildContext context) {
    return Scaffold(
      body: Center(
        child: Text(
          'Hello Ubuntu',
          style: TextStyle(
            color: Theme.of(context).primaryColor,
          ),
        ),
      ),
    );
  }
}
-
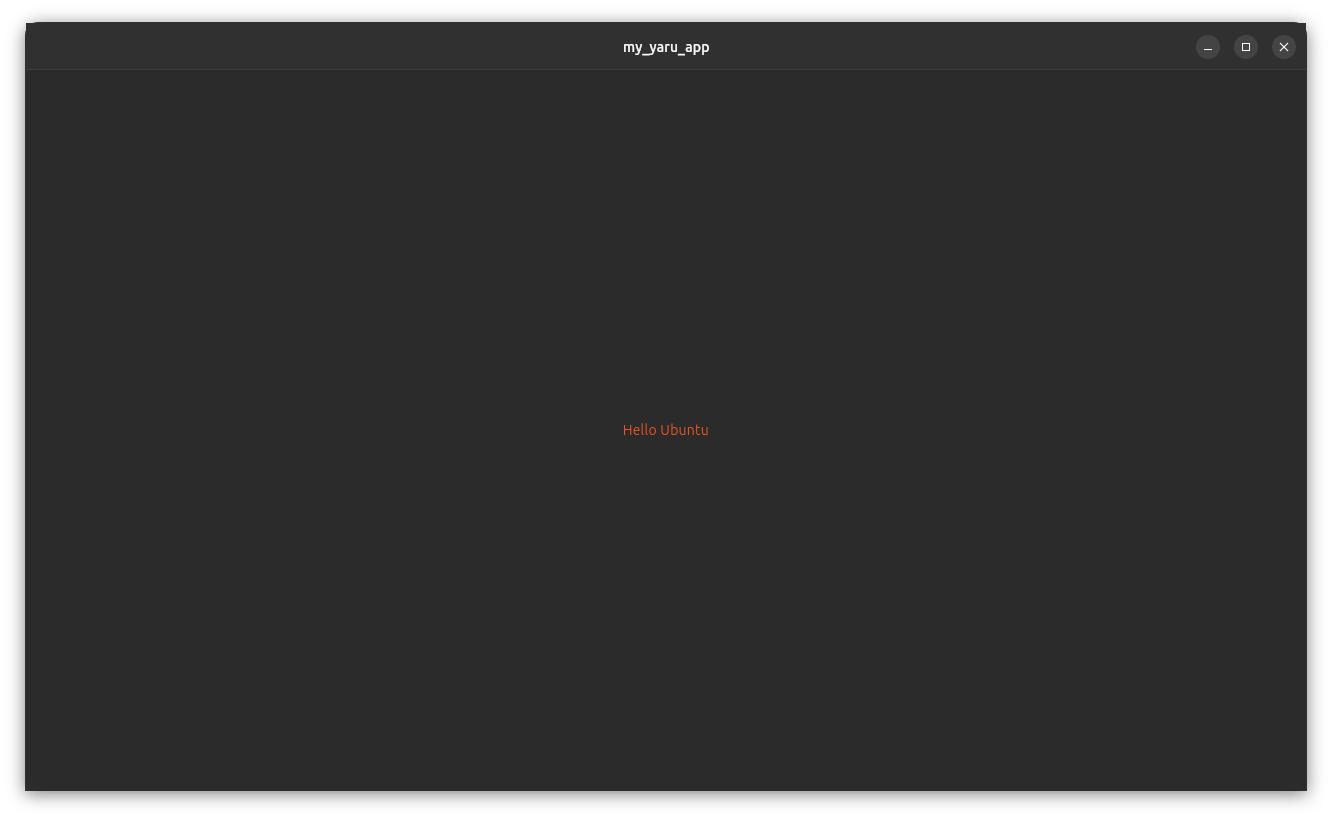
Save your file and notice how the text is now colored in your system's primary accent color, while the window follows your system dark/light theme preference:
Alright, take a deep breath!
The basic yaru theme and colors are in but we got more things to do:
- Make the window consist of 100% flutter widgets with client side window decorations <-- next
- Make the window have 4 founded corners
- Create a master detail app
- use yaru_icons
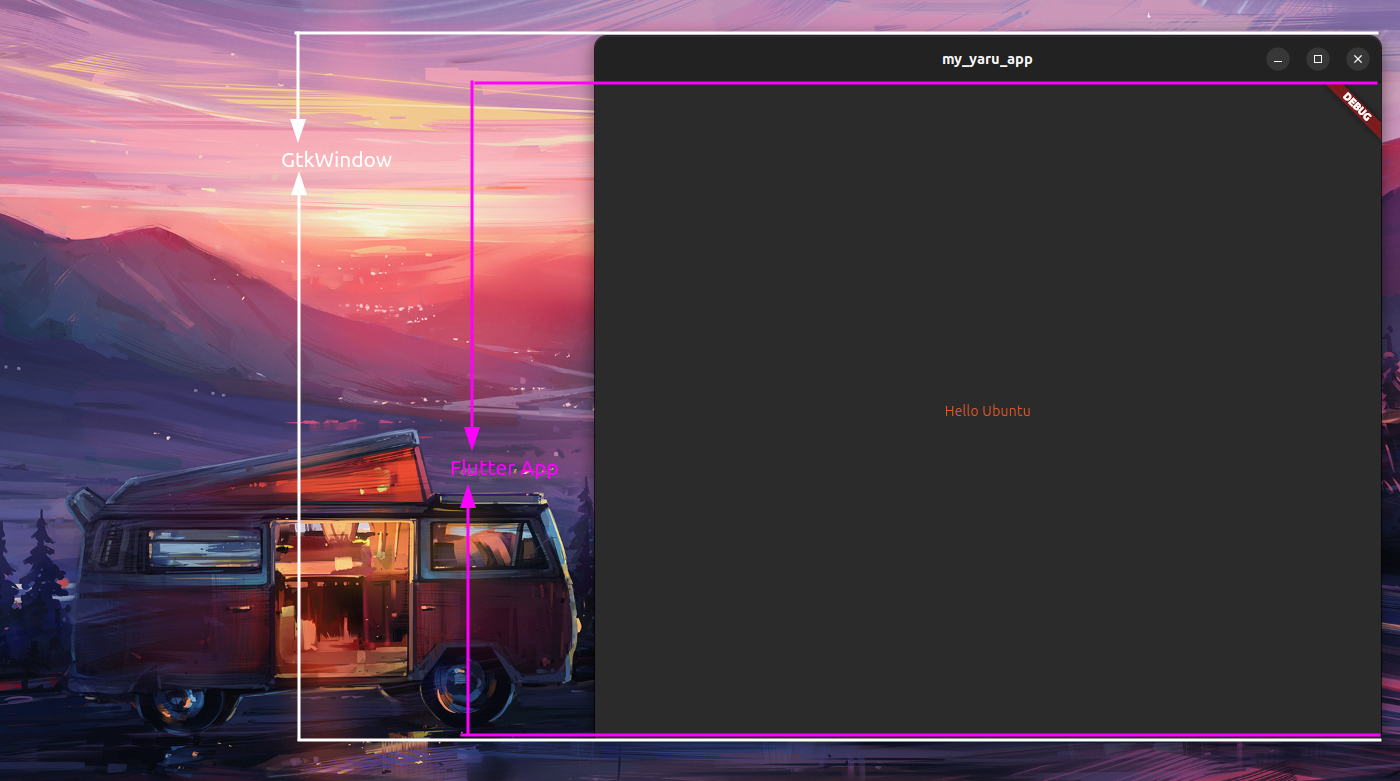
As you may have observed the app is living inside a GTK window.
This is totally fine as it is because it works. However we aim to have the best look as possible, so we will need to use another YaruWindowTitleBar.
-
In your main.dart file write
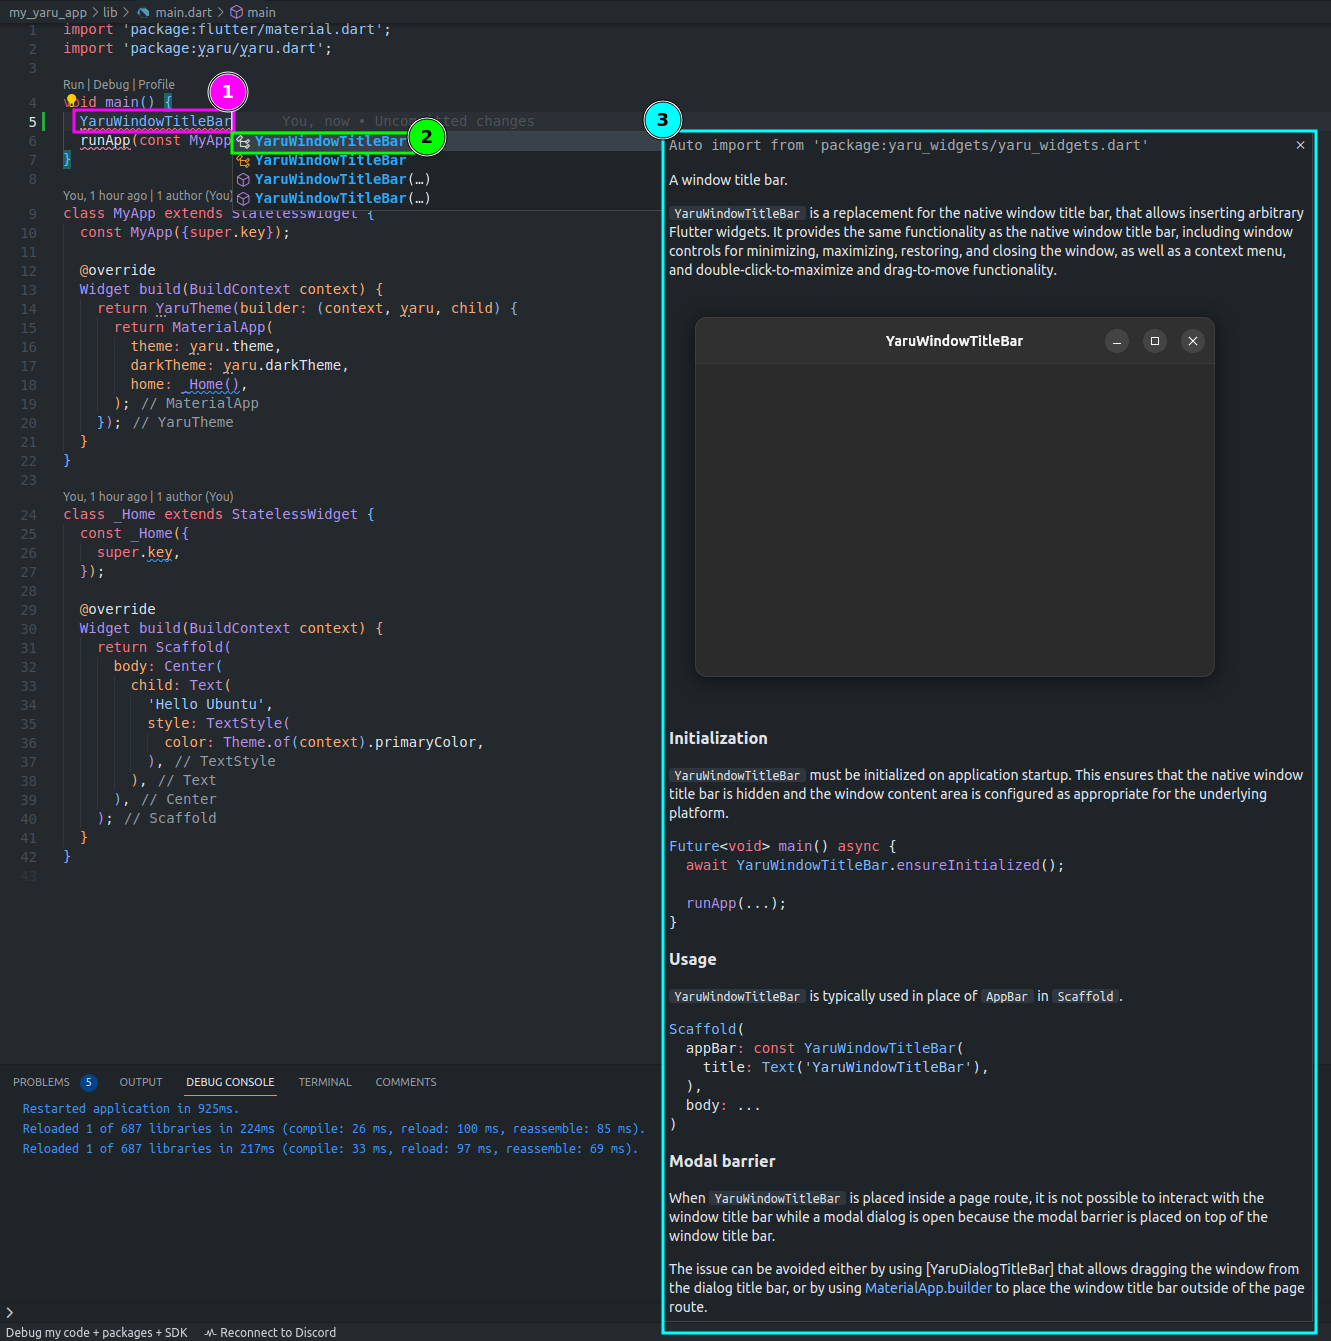
YaruWindowTitleBarbefore you callrunApp. -
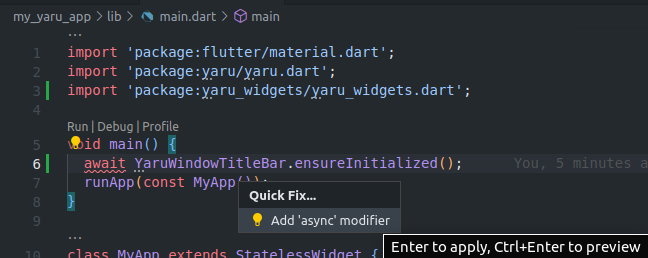
Complete the line by using the
awaitkeyword, and callingYaruWindowTitleBar.ensureInitialized() -
Use the recommended quick fix by pressing enter when "Add 'async' modifier" is selected
Your
mainfunction should now look like this:Future<void> main() async { await YaruWindowTitleBar.ensureInitialized(); runApp(const MyApp()); }
-
Inside your
_Homechange theappBarproperty ofScaffoldtoYaruWindowTitleBar() -
Inside your
MyAppchange thedebugShowCheckedModeBannerproperty to have the valuefalseto remove the red debug banner in the window cornerYour code should now look like this:
import 'package:flutter/material.dart';
import 'package:yaru/yaru.dart';

Future<void> main() async {
  await YaruWindowTitleBar.ensureInitialized();
  runApp(const MyApp());
}

class MyApp extends StatelessWidget {
  const MyApp({super.key});

  @override
  Widget build(BuildContext context) {
    return YaruTheme(builder: (context, yaru, child) {
      return MaterialApp(
        debugShowCheckedModeBanner: false,
        theme: yaru.theme,
        darkTheme: yaru.darkTheme,
        home: _Home(),
      );
    });
  }
}

class _Home extends StatelessWidget {
  const _Home({
    super.key,
  });

  @override
  Widget build(BuildContext context) {
    return Scaffold(
      appBar: YaruWindowTitleBar(),
      body: Center(
        child: Text(
          'Hello Ubuntu',
          style: TextStyle(
            color: Theme.of(context).primaryColor,
          ),
        ),
      ),
    );
  }
}
Since yaru also modified the Linux specific files we did not look into (yet) you need to restart the app this time completely.
It's getting the first time a little bit complicated. Please do not panic. Everything is described step by step!
Now we will need to modify two files inside the Linux directory to get the full Yaru look.
- add
handy_windowlike you've added the other dependencies before - Modify
linux/my_application.ccto register plugins before showing the Flutter window and view:
diff --git a/linux/my_application.cc b/linux/my_application.cc
index fa74baa..3133755 100644
--- a/linux/my_application.cc
+++ b/linux/my_application.cc
@@ -48,17 +48,17 @@ static void my_application_activate(GApplication* application) {
   }

   gtk_window_set_default_size(window, 1280, 720);
-  gtk_widget_show(GTK_WIDGET(window));

   g_autoptr(FlDartProject) project = fl_dart_project_new();
   fl_dart_project_set_dart_entrypoint_arguments(project, self->dart_entrypoint_arguments);

   FlView* view = fl_view_new(project);
-  gtk_widget_show(GTK_WIDGET(view));
   gtk_container_add(GTK_CONTAINER(window), GTK_WIDGET(view));

   fl_register_plugins(FL_PLUGIN_REGISTRY(view));

+  gtk_widget_show(GTK_WIDGET(window));
+  gtk_widget_show(GTK_WIDGET(view));
   gtk_widget_grab_focus(GTK_WIDGET(view));
}- Stop it, and start it again.
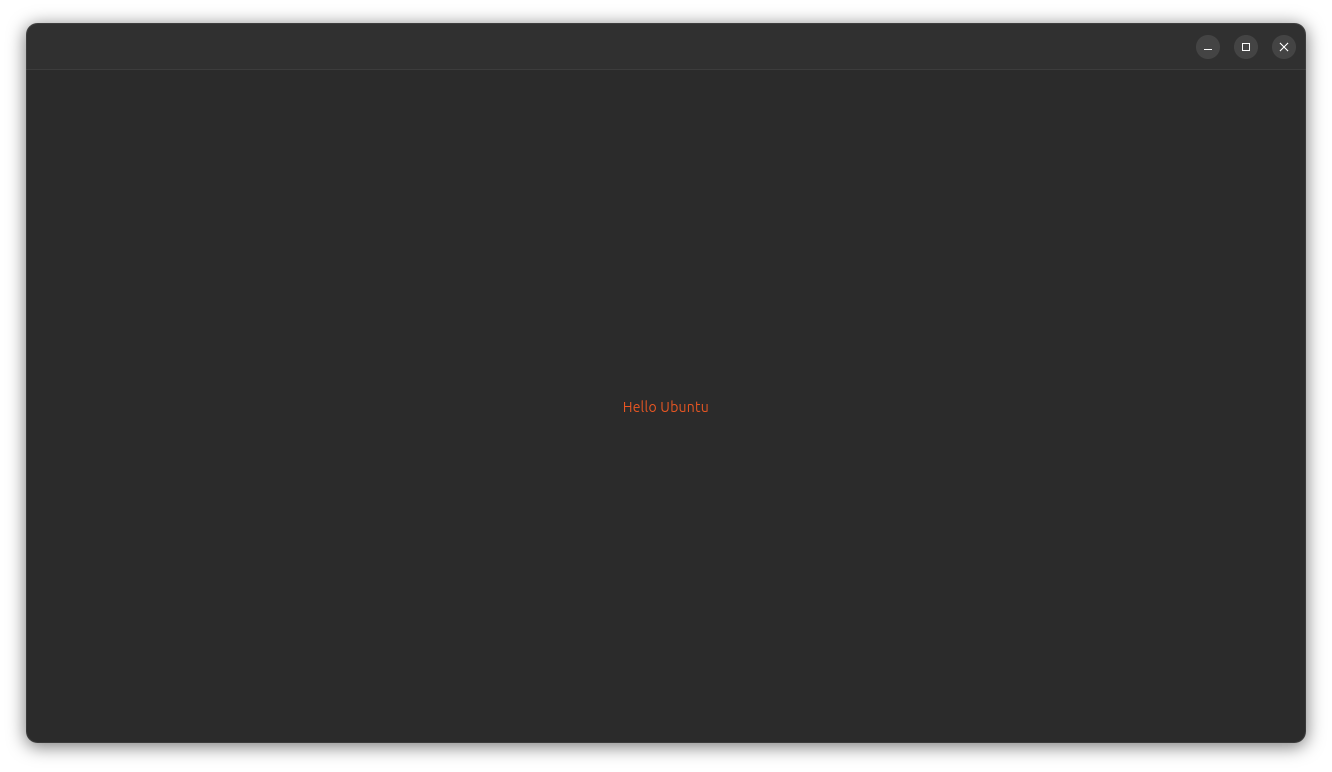
Tadah!!! Your app should now look like this:
Most of the desktop apps we've encountered could be classified into one of the following "concepts":
That does not mean there aren't more types of apps and most importantly this should not limit your ideas and creativity in any way.
In this tutorial we create a master/details-app, because this type of app is pretty common in desktop environments.
-
replace the value of the
bodyproperty of you_HomewithYaruMasterDetailPage() -
set the
lengthproperty an integer value that matches the amount o pages you plan to add -
write
tileBuilderbeneath thelengthproperty and wait for the auto complete context menu -
press enter after you selected
(context, index, selected) {}with pressing the arrow-down key -
write
pageBuilderbeneath thetileBuilderproperty -
press enter after you selected
(context, index) {}with pressing the arrow-down keyYour
_Homecode should now look like this (not done yet):class _Home extends StatelessWidget { const _Home({ super.key, }); @override Widget build(BuildContext context) { return Scaffold( appBar: YaruWindowTitleBar(), body: YaruMasterDetailPage( length: 2, tileBuilder: (context, index, selected, availableWidth) {}, pageBuilder: (context, index) {}, ), ); } }
-
inside the
tileBuildercallback return a differentYaruMasterTile()depending if the value ofindexis0or not -
inside the
pageBuildercallback return a differentWidgetdepending if the value ofindexis0or notYour
_Homecould now look like this, as a starting point:class _Home extends StatelessWidget { const _Home({super.key}); @override Widget build(BuildContext context) { return Scaffold( appBar: YaruWindowTitleBar(), body: YaruMasterDetailPage( length: 2, tileBuilder: (context, index, selected, availableWidth) { if (index == 0) { return YaruMasterTile(title: Text('Page 1')); } else { return YaruMasterTile(title: Text('Page 2')); } }, pageBuilder: (context, index) { if (index == 0) { return Center( child: Text('Hello Ubuntu'), ); } else { return Center( child: Text('Hello Yaru'), ); } }, ), ); } }
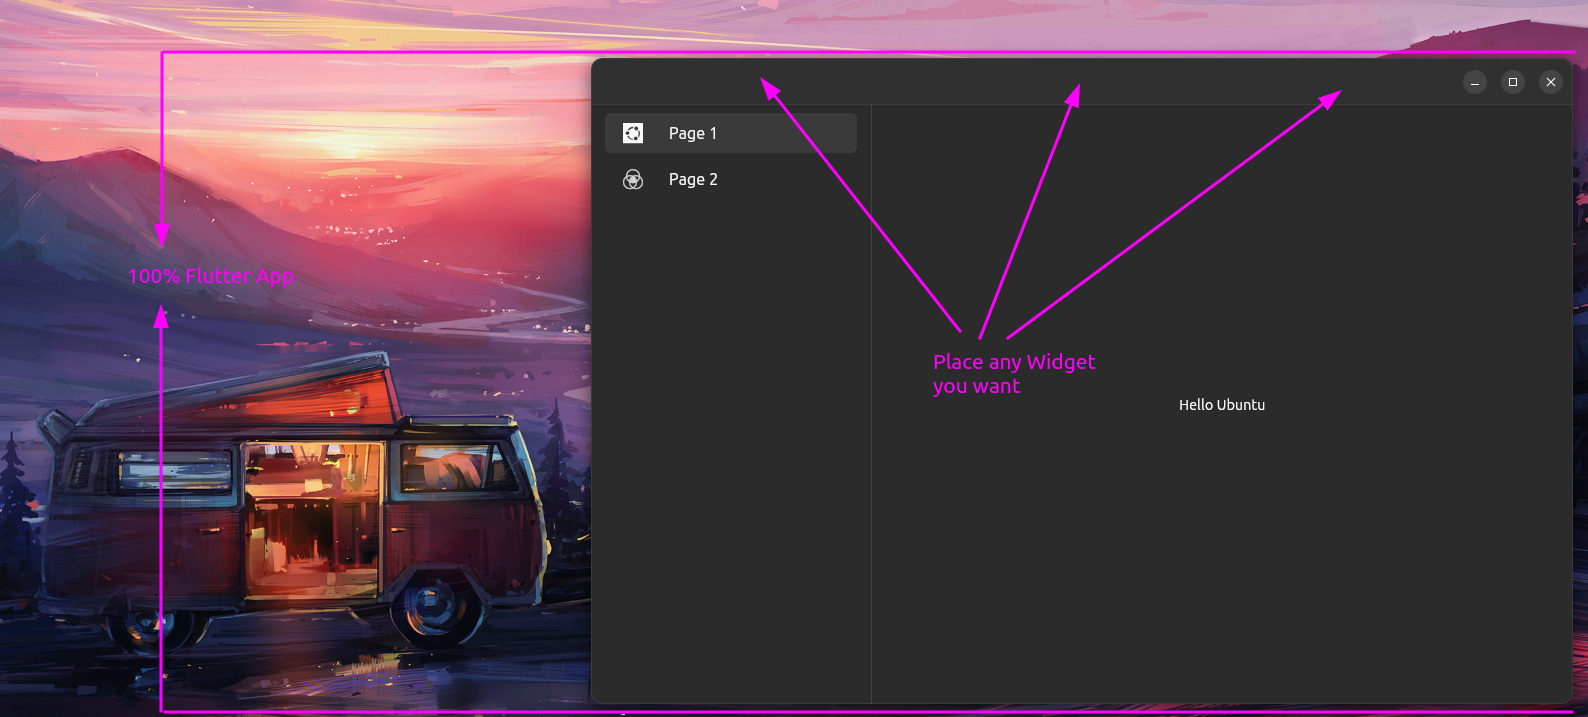
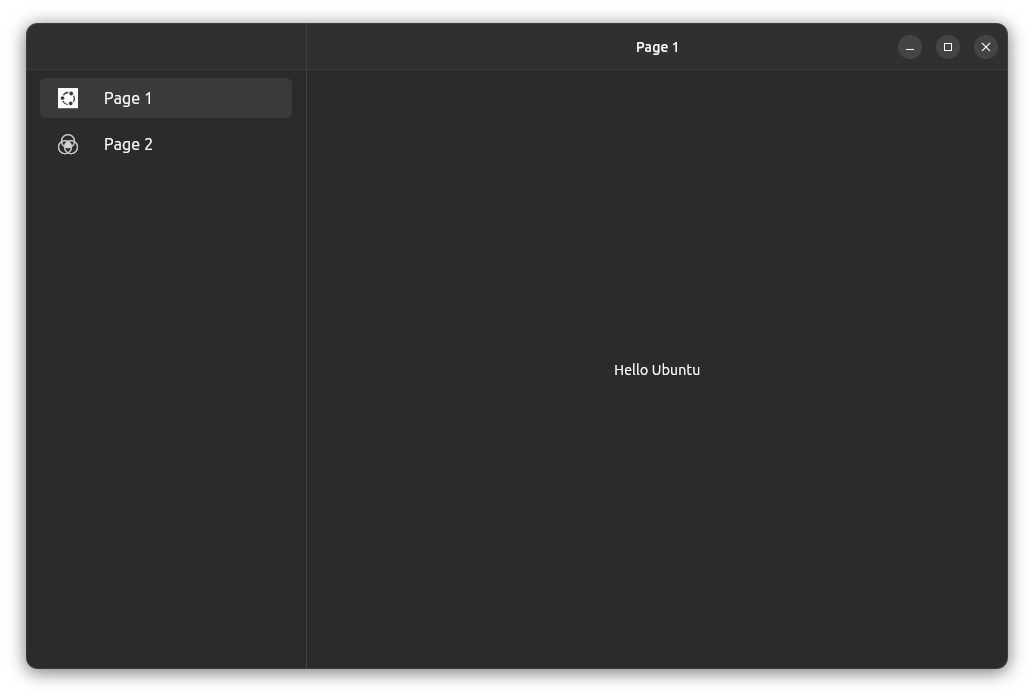
With this code, your app would look like this:
The thin stroked, sleek Yaru Icons are elemental for the full Yaru look and fit perfectly to the Ubuntu font. Icons can be used anywhere in a Flutter app, since they are Widgets. In our example we chose them to use as a leading widget in your master view.
-
change the
leadingproperty of yourYaruMasterTiles to have the valueIcon(YaruIcons.XXXX)whereXXXXis any icon you want to have -
There is a nice overview of currently available icons on this website (also made with flutter): https://ubuntu.github.io/yaru.dart/
-
to finally get rid of all blue underlines (warnings) run the command
dart fix --applyThe current version of your
main.dartcode for this tutorial could be the following, depending on what pages and tiles you've chosen to show:import 'package:flutter/material.dart'; import 'package:yaru/yaru.dart'; Future<void> main() async { await YaruWindowTitleBar.ensureInitialized(); runApp(const MyApp()); } class MyApp extends StatelessWidget { const MyApp({super.key}); @override Widget build(BuildContext context) { return YaruTheme(builder: (context, yaru, child) { return MaterialApp( debugShowCheckedModeBanner: false, theme: yaru.theme, darkTheme: yaru.darkTheme, home: const _Home(), ); }); } } class _Home extends StatelessWidget { const _Home(); @override Widget build(BuildContext context) { return Scaffold( appBar: const YaruWindowTitleBar(), body: YaruMasterDetailPage( length: 2, tileBuilder: (context, index, selected, availableWidth) { if (index == 0) { return const YaruMasterTile( leading: Icon(YaruIcons.ubuntu_logo), title: Text('Page 1'), ); } else { return const YaruMasterTile( leading: Icon(YaruIcons.colors), title: Text('Page 2'), ); } }, pageBuilder: (context, index) { if (index == 0) { return const Center( child: Text('Hello Ubuntu'), ); } else { return const Center( child: Text('Hello Yaru'), ); } }, ), ); } }
-
notice the four rounded window corners
-
notice the elegant window border and shadows
-
the whole window is now 100% flutter and you could add any Flutter Widget you like
-
Idea: add a split YaruWindowTitleBar
-
Idea: Wrap the pages in
YaruDetailPageand let them have their ownYaruWindowTitleBar() -
Possible
_Homecodeclass _Home extends StatelessWidget { const _Home(); @override Widget build(BuildContext context) { return Scaffold( body: YaruMasterDetailPage( length: 2, appBar: const YaruWindowTitleBar(), tileBuilder: (context, index, selected, availableWidth) { if (index == 0) { return const YaruMasterTile( leading: Icon(YaruIcons.ubuntu_logo), title: Text('Page 1'), ); } else { return const YaruMasterTile( leading: Icon(YaruIcons.colors), title: Text('Page 2'), ); } }, pageBuilder: (context, index) { if (index == 0) { return const YaruDetailPage( appBar: YaruWindowTitleBar( title: Text('Page 1'), ), body: Center( child: Text('Hello Ubuntu'), ), ); } else { return const YaruDetailPage( appBar: YaruWindowTitleBar( title: Text('Page 2'), ), body: Center( child: Text('Hello Yaru'), ), ); } }, ), ); } }
-
Resulting UI (However those are just ideas which should not limit your ideas in any way!)
VsCode quick commands make it really easy to wrap, extract and move Widgets, wrap parts inside control blocks or quick fix. Use this power to extract and split your code into multiple files and Widgets.
In addition to material.dart, yaru.dart offers a ton of good looking widgets to chose from, which fit perfectly into the Ubuntu desktop.
Check them out by either browsing https://ubuntu.github.io/yaru.dart/#/ or by installing sudo snap install yaru-widgets-example
 |
| All widgets have a short example page with the source code how to use them. |
Hopefully this tutorial was helpful, thanks for reading!
- supabase (open source firebase alternative)
- appwrite (oppen source firebase alternative)
- amazon amplify (<--- Linux support in dev branch)
- firebase
