Please use XeLaTeX or LuaLaTex for building.
Get a quick start by reading learn LaTeX in Y minutes.
- all formal layout-properties of the document are in accordance to the requirements given by the Technical Faculty of DHBW Mannheim.
- Titlepages for Internship Reports, Study Reports and Bachelor Thesis in accordance to these requirements included
- Fully customizable coloring
- Easy switching between the (default) english and german version of the document
- inside
./usersetup.tex:- choose the type of your report
- fill out the fields providing your informations
- choose additional options if you like, i.e. adding a confidentiality clause, marking the output as a draft or adapting names in the output for a german main part
- choose your desired color theme or define your own
- place the entries for your bibliography into
./resources/references.bib - place the
.tex-files containing your content into./contentand define the structure of your content inside./content/content.tex - fill your acronyms and custom macros as needed into
./content/acronyms.texand./content/macros.tex - save your image files into
./resources- you can then use them easily by just referencing e.g.
\includegraphics{asdf}if you saved your file at./resources/asdf.png
- you can then use them easily by just referencing e.g.
- build the document
- when using Sublime Text: after installing LateXTools, press Ctrl+Shift+B, navigate to "LaTeX - Basic Builder - XeLaTeX" using the arrow keys and press Return. From now on you can simple build by pressing Ctrl+B.
- when using TeXworks: make sure to select "XeLaTeX+MakeIndex+BibTeX" in the dropdown inside the top tool-bar before pressing the green Typeset button.
- when using the command line directly:
xelatex main.tex && biber main.bcf && xelatex main.tex && xelatex main.tex
Note: <asdf> inside the general code denotes a placeholder
\begin{stripedacenttable}
    {<caption>}
    {\label{tab:<label>}}
    {<formating>}
    {<Headings-Content>}
    <row definitions>
\end{stripedacenttable}

\begin{stripedtable}
    {<caption>}
    {\label{tab:<label>}}
    {<coloring>}
    {<formating>}
    {<Headings-Content>}
    <row definitions>
\end{stripedtable}- needs to be enclosed inside
\labelto keep the auto-completion functionality of your editor working correctly - formating should have the form
x^x^x^...wherexspecifies the alignment for the column- possible aligments:
l: left-aligned ,c: centered ,r: right-aligned ,p{ycm}: left-aligend, with automatic line-breaks if the column would stretch over y cm - inside a
pcell, additionally\newline{}can be used to force a line-break
- possible aligments:
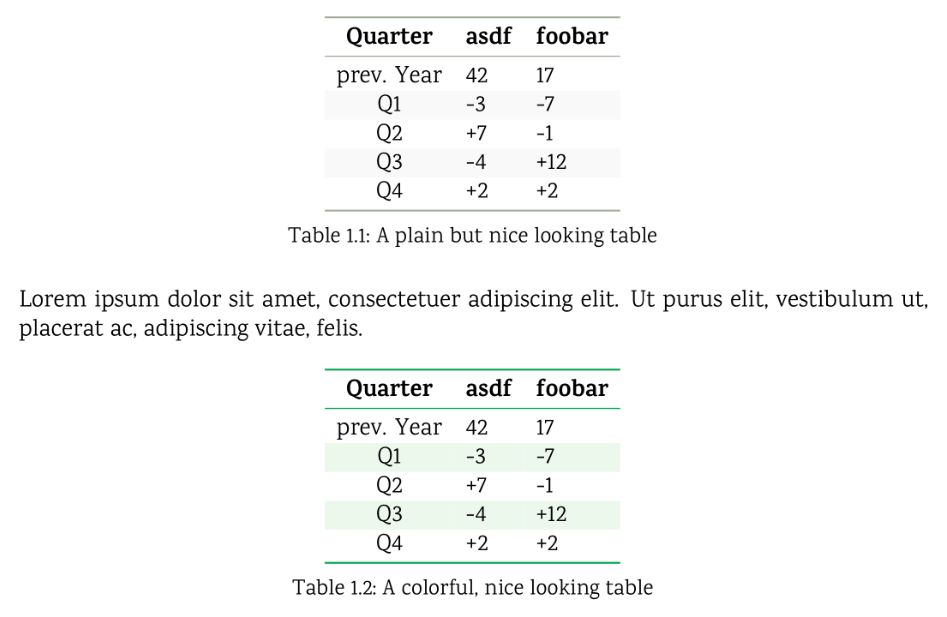
Example (with captions):
\begin{stripedacenttable}
   {A plain but nice looking table}
   {\label{tab:ex1}}
   {c^l^l}
   {Quarter & asdf & foobar}
   prev. Year & 42 & 17 \\
   Q1 & -3 & -7 \\
   Q2 & +7 & -1 \\
   Q3 & -4 & +12 \\
   Q4 & +2 & +2 \\
\end{stripedacenttable}

Lorem ipsum dolor sit amet, consectetuer adipiscing elit. Ut purus elit, vestibulum ut, placerat ac, adipiscing vitae, felis.

\begin{stripedtable}
   {A colorful, nice looking table}
   {\label{tab:ex1}}
   {Green}
   {c^l^l}
   {Quarter & asdf & foobar}
   prev. Year & 42 & 17 \\
   Q1 & -3 & -7 \\
   Q2 & +7 & -1 \\
   Q3 & -4 & +12 \\
   Q4 & +2 & +2 \\
\end{stripedtable}
\begin{lstlisting}[
    caption={<description of your program>},
    label={lst:<label>},
    captionpos=b,
    language=<language-name>
]
<your code>
\end{lstlisting}
Example:
\begin{lstlisting}[
   caption={The Classic, realized in Python},
   label={lst:python1},
   captionpos=b,
   language=Python
]
# classic

hi = "Hello Wolrd"
print(hi)
\end{lstlisting}
\begin{notebox}{<border-color>}{<icon>}
<your text>
\end{notebox}

\begin{infobox}
<your text>
\end{infobox}

\begin{warnbox}
<your text>
\end{warnbox}
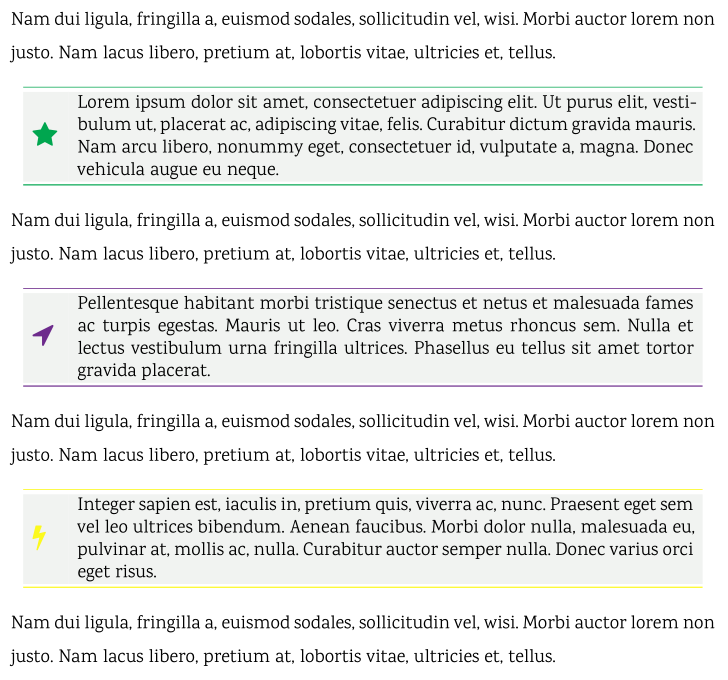
Example:
Nam dui ligula, fringilla a, euismod sodales, sollicitudin vel, wisi. Morbi auctor lorem non justo. Nam lacus libero, pretium at, lobortis vitae, ultricies et, tellus.

\begin{notebox}{Green}{\faStar{}}
Lorem ipsum dolor sit amet, consectetuer adipiscing elit. Ut purus elit, vesti- bulum ut, placerat ac, adipiscing vitae, felis. Curabitur dictum gravida mauris. Nam arcu libero, nonummy eget, consectetuer id, vulputate a, magna. Donec vehicula augue eu neque.
\end{notebox}

Nam dui ligula, fringilla a, euismod sodales, sollicitudin vel, wisi. Morbi auctor lorem non justo. Nam lacus libero, pretium at, lobortis vitae, ultricies et, tellus.

\begin{infobox}
Pellentesque habitant morbi tristique senectus et netus et malesuada fames ac turpis egestas. Mauris ut leo. Cras viverra metus rhoncus sem. Nulla et lectus vestibulum urna fringilla ultrices. Phasellus eu tellus sit amet tortor gravida placerat.
\end{infobox}

Nam dui ligula, fringilla a, euismod sodales, sollicitudin vel, wisi. Morbi auctor lorem non justo. Nam lacus libero, pretium at, lobortis vitae, ultricies et, tellus.

\begin{warnbox}
Integer sapien est, iaculis in, pretium quis, viverra ac, nunc. Praesent eget sem vel leo ultrices bibendum. Aenean faucibus. Morbi dolor nulla, malesuada eu, pulvinar at, mollis ac, nulla. Curabitur auctor semper nulla. Donec varius orci eget risus.
\end{warnbox}

Nam dui ligula, fringilla a, euismod sodales, sollicitudin vel, wisi. Morbi auctor lorem non justo. Nam lacus libero, pretium at, lobortis vitae, ultricies et, tellus.
The FontAwesome Package is bundeled into this repository, so you can use all the nice symbols..
Example:
\faFileTextO{} \faStar{}\faStar{}\faStar{}\faStar{}\faStar{} $=$ \faGraduationCap{}
The MarVoSym-Package is also loaded to provide additional symbols.
Example:
\Estatically{} \Forward{} \Printer{} \ \ \MVRightArrow{} \ \ \EyesDollar\EyesDollar\EyesDollar
\footnotecite{<source-reference>}\incompletemarker{<note>}\begin{absolutelynopagebreak}
<content>
\end{absolutelynopagebreak}I'm open for all forks, feedback and Pull Requests ;)
This project is licensed under the terms of the GNU General Public License v3.0. For further information, please look here or here(DE).


