The ricecooker library is a framework for creating Kolibri content channels and
uploading them to Kolibri Studio, which
is the central content server that Kolibri
applications talk to when they import content.
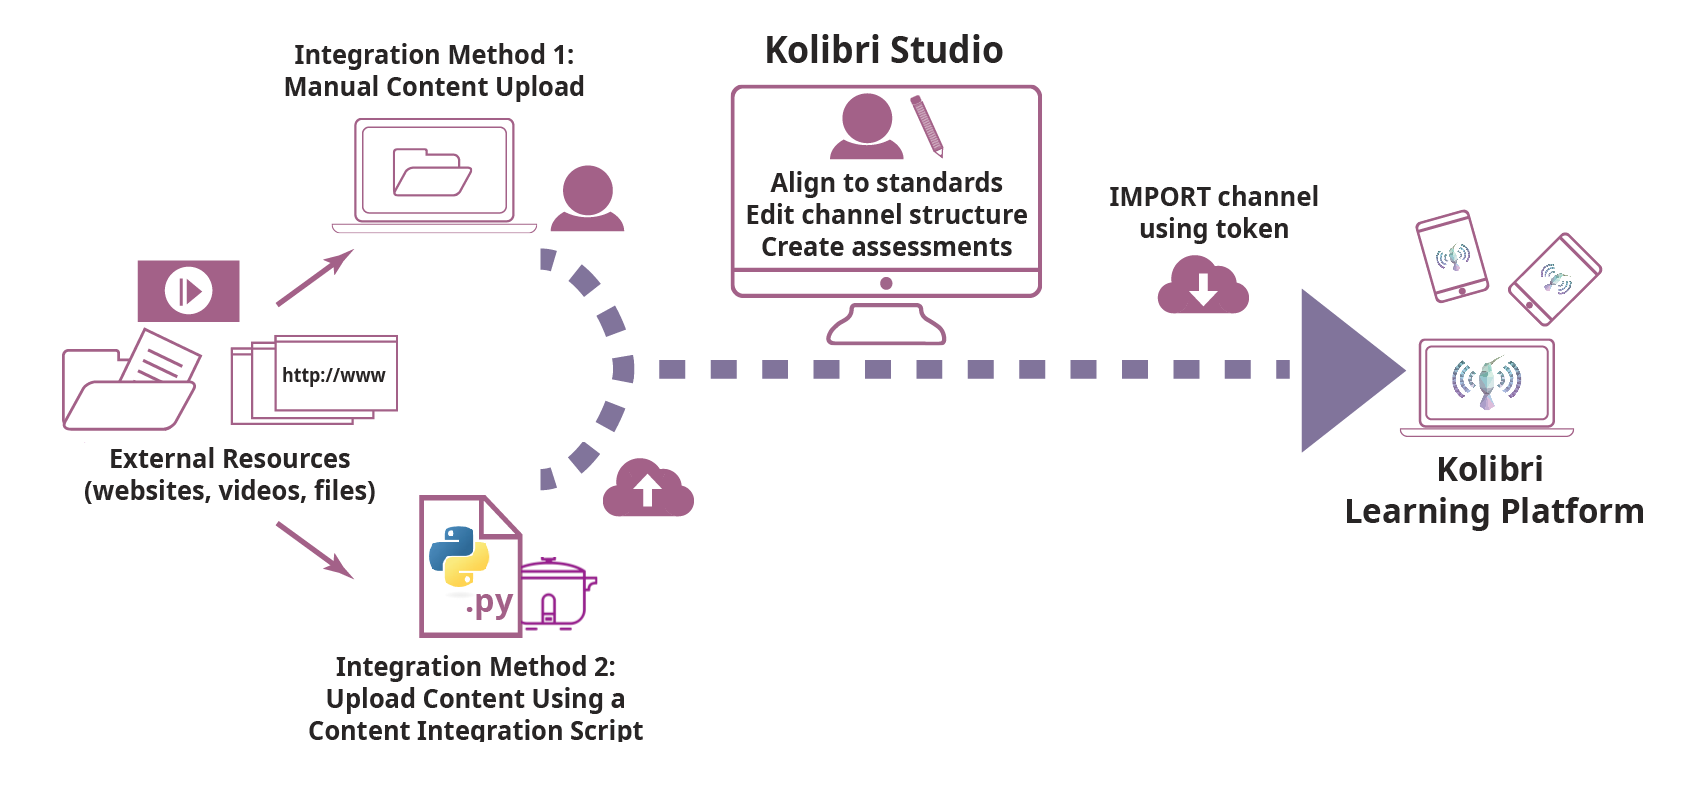
The Kolibri content pipeline is pictured below:
This ricecooker framework is the "main actor" in the first part of the content
pipeline, and touches all aspects of the pipeline within the region highlighted
in blue in the above diagram.
Before we continue, let's have some definitions:
- A Kolibri channel is a tree-like data structure that consist of the following content nodes:
- Topic nodes (folders)
- Content types:
- Document (
pdfandepubfiles) - Audio (
mp3files) - Video (
mp4files and subtitles) - HTML5App
zipfiles (generic container for web content: HTML+JS+CSS) - Exercises
- Document (
- A sushi chef is a Python script that uses the
ricecookerlibrary to import content from various sources, organize content into Kolibri channels and upload the channel to Kolibri Studio.
Use the following shortcuts to jump to the most relevant parts of the ricecooker
documentation depending on your role:
-
Content specialists and Administrators can read the non-technical part of the documentation to learn about how content works in the Kolibri platform.
- The best place to start is the Kolibri Platform overview.
- Read more about the supported content types here
- Content curators can consult this document for information about how to prepare "spec sheets" that guide developers how to import content into the Kolibri ecosystem.
- The Non-technical of particular interest is the CSV workflow channel metadata as spreadsheets
-
Chef authors can read the remainder of this README, and get started using the
ricecookerlibrary by following these first steps:- Quickstart, which will introduce you to the steps needed to create a sushi chef script.
- After the quickstart, you should be ready to take things into your own hands, and complete all steps in the ricecooker tutorial.
- The next step after that is to read the ricecooker usage docs, which is also available Jupyter notebooks under docs/tutorial/. More detailed technical documentation is available on the following topics:
- Installation
- Content Nodes
- File types
- Exercises
- HTML5 apps
- Parsing HTML
- Running chef scripts to learn about the command line args, for controlling chef operation, managing caches, and other options.
- Sushi chef style guide
-
Ricecooker developers should read all the documentation for chef authors, and also consult the docs in the developer/ folder for additional information info about the "behind the scenes" work needed to support the Kolibri content pipeline:
- Running chef scripts, also known as chefops.
- Running chef scripts in daemon mode
- Managing the content pipeline, also known as sushops.
We'll assume you have a Python 3 installation on your computer and are familiar
with best practices for working with Python codes (e.g. virtualenv or pipenv).
If this is not the case, you can consult the Kolibri developer docs as a guide for
setting up a Python virtualenv.
The ricecooker library is a standard Python library distributed through PyPI:
- Run
pip install ricecookerto install You can then useimport ricecookerin your chef script. - Some of functions in
ricecooker.utilsrequire additional software:- Make sure you install the command line tool ffmpeg
- Running javascript code while scraping webpages requires the phantomJS browser.
You can run
npm install phantomjs-prebuiltin your chef's working directory.
For more details and install options, see docs/installation.md.
This is a sushi chef script that uses the ricecooker library to create a Kolibri
channel with a single topic node (Folder), and puts a single PDF content node inside that folder.
#!/usr/bin/env python
from ricecooker.chefs import SushiChef
from ricecooker.classes.nodes import ChannelNode, TopicNode, DocumentNode
from ricecooker.classes.files import DocumentFile
from ricecooker.classes.licenses import get_license


class SimpleChef(SushiChef):
    channel_info = {
        'CHANNEL_TITLE': 'Potatoes info channel',
        'CHANNEL_SOURCE_DOMAIN': '<domain.org>',         # where you got the content (change me!!)
        'CHANNEL_SOURCE_ID': '<unique id for channel>',  # channel's unique id (change me!!)
        'CHANNEL_LANGUAGE': 'en',                        # le_utils language code
        'CHANNEL_THUMBNAIL': 'https://upload.wikimedia.org/wikipedia/commons/b/b7/A_Grande_Batata.jpg', # (optional)
        'CHANNEL_DESCRIPTION': 'What is this channel about?',      # (optional)
    }

    def construct_channel(self, **kwargs):
        channel = self.get_channel(**kwargs)
        potato_topic = TopicNode(title="Potatoes!", source_id="<potatos_id>")
        channel.add_child(potato_topic)
        doc_node = DocumentNode(
            title='Growing potatoes',
            description='An article about growing potatoes on your rooftop.',
            source_id='pubs/mafri-potatoe',
            license=get_license('CC BY', copyright_holder='University of Alberta'),
            language='en',
            files=[DocumentFile(path='https://www.gov.mb.ca/inr/pdf/pubs/mafri-potatoe.pdf',
                                language='en')],
        )
        potato_topic.add_child(doc_node)
        return channel


if __name__ == '__main__':
    """
    Run this script on the command line using:
        python simple_chef.py -v --reset --token=YOURTOKENHERE9139139f3a23232
    """
    simple_chef = SimpleChef()
    simple_chef.main()
Let's assume the above code snippet is saved as the file simple_chef.py.
You can run the chef script by passing the appropriate command line arguments:
python simple_chef.py -v --reset --token=YOURTOKENHERE9139139f3a23232
The most important argument when running a chef script is --token which is used
to pass in the Studio Access Token which you can obtain from your profile's
settings page.
The flags -v (verbose) and --reset are generally useful in development.
These make sure the chef script will start the process from scratch and displays
useful debugging information on the command line.
To see all the ricecooker command line options, run python simple_chef.py -h.
For more details about running chef scripts see the chefops page.
If you get an error when running the chef, make sure you've replaced
YOURTOKENHERE9139139f3a23232 by the token you obtained from Studio.
Also make sure you've changed the value of channel_info['CHANNEL_SOURCE_DOMAIN']
and channel_info['CHANNEL_SOURCE_ID'] instead of using the default values.
- See the usage docs for more explanations about the above code.
- See nodes to learn how to create different content node types.
- See file to learn about the file types supported, and how to create them.
- Read the Kolibri Studio docs to learn more about the Kolibri Studio features
- Read the Kolibri user guide to learn how to install Kolibri on your machine (useful for testing channels)
- Read the Kolibri developer docs to learn about the inner workings of Kolibri.
